Business Challenge
HR teams struggle with a complex, multi-step process to create employees and their Salesforce User accounts, leading to delays and errors. Manual license checks and inconsistent role/profile assignments add to inefficiencies. Lack of automation in user creation and password setup increases administrative workload. A streamlined, guided interface is needed to simplify onboarding and ensure accuracy.
Requirement
HR teams need a simple, guided interface to create employees and their Salesforce User accounts in one seamless process. The system should automatically check license availability and prevent errors before user creation. Profile and role selection should be dynamic, allowing easy assignment based on department needs. Additionally, automated password setup and email notifications should ensure quick user activation.
Steps to achieve the Requirement
- Create a Screen Flow.
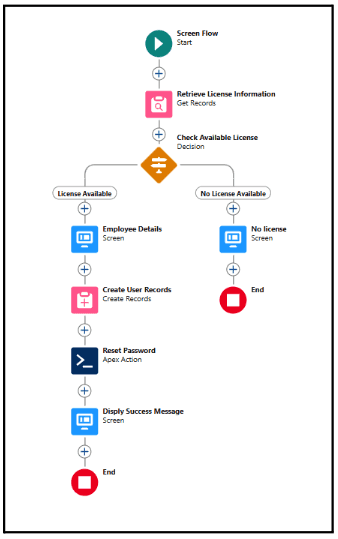
- Retrieve Available Salesforce Licenses.
- Check License Availability.
- Show Error Message If No License Is Available.
- Collect Employee Details.
- Create Formulas for Alias, Username & Nickname
- Create the User Record.
- Reset the User Password.
- Display Success Message.
- Create Employee Records using Record Triggered flow.
1. Create a Screen Flow :
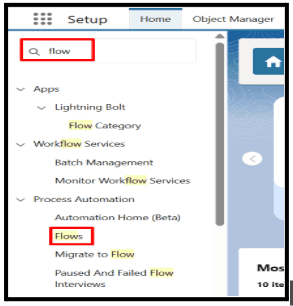
1.1. In the Quick Find search bar, type and select Flows.
1.2. Click New Flow.
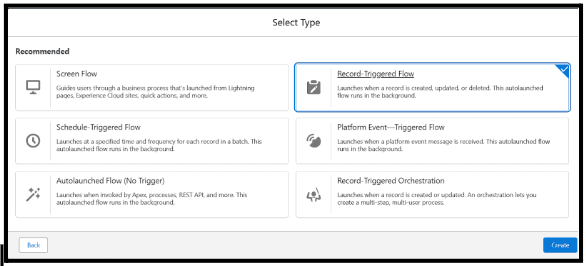
1.3. Select Screen flow → Click Create.
2. Retrieve Available Salesforce Licenses
2.1. Select (+) icon and Select the Get Records element.
2.2. Choose User License Object.
2.3. Select All Conditions are Met(AND) as a condition requirement
2.4. Set the following condition as mentioned in the screenshot below.
Name → Equals → Salesforce.
2.5. Under How many records to store select Only the first record.
2.6. Under How to store Record Data select Automatically store all fields.
3. Check License Availability
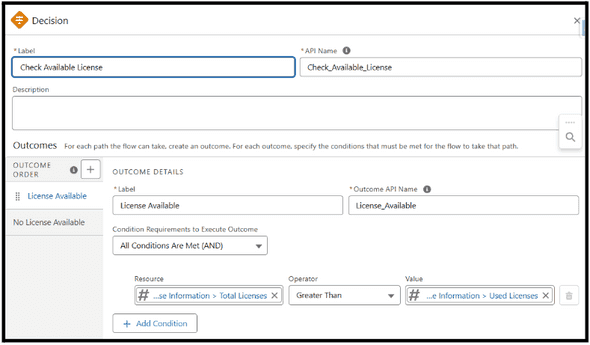
3.1. Select (+) icon and Select Decision Element.
3.2. Give Outcome1 Label as License Available.
3.3. Set the following condition as mentioned in the screenshot below.
3.3.1. User License from Retrieve License Information>Total Licenses → Greater Than → User License from Retrieve License Information>Used Licenses.
4. Show Error Message If No License Is Available
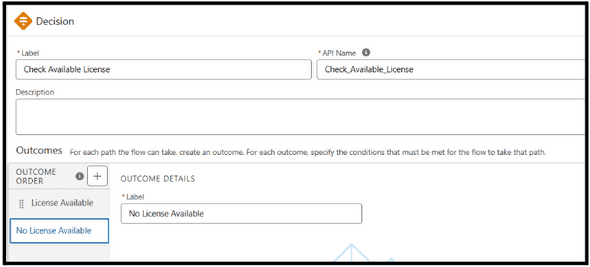
4.1. Give Outcome2 Label as No License Available.
4.1.1. If no licenses are available, display an error message to inform the user.
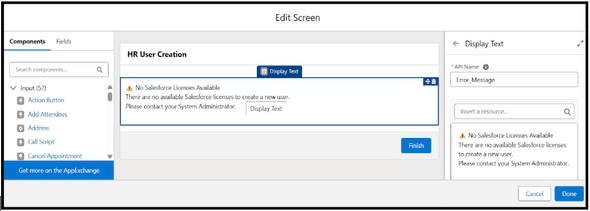
4.2. Select (+) icon and Select Screen.
4.2.1. Drag and drop a Display Text component onto the screen.
4.2.2. Set the API Name is Error Message to indicate the field purpose.
4.3. Click Done.
5. Collect Employee Details
5.1. Select (+) icon and Select Screen.
5.2. Drag and drop a Text component onto the screen.
5.2.1. Set the Label as First Name to indicate the field purpose.
5.2.2. Check the Required checkbox to ensure users enter a value before proceeding.
5.2.3. In the API Name, set it as First Name
5.3. Drag and drop a Text component onto the screen.
5.3.1. Set the Label as Last Name to indicate the field purpose.
5.3.2. Check the Required checkbox to ensure users enter a value before proceeding.
5.3.3. In the API Name, set it as Last Name.
5.4. Drag and drop an Email component onto the screen.
5.4.1. Set the Label as Email to indicate the field purpose.
5.4.2. In the API Name, set it as Email.
5.5. Add a Picklist for the Department in the Screen Flow.
5.5.1. Click Add Component → Select Picklist.
5.5.2. Label: Department
5.5.3. API Name: Department
5.5.4. Choice Values:
5.5.4.1. Click New Choice → Enter Label and Value
5.5.4.2. Label: "Sales" | Value: "Sales"
5.5.4.3. Label: "Marketing" | Value: "Marketing"
5.5.5. Click Done.
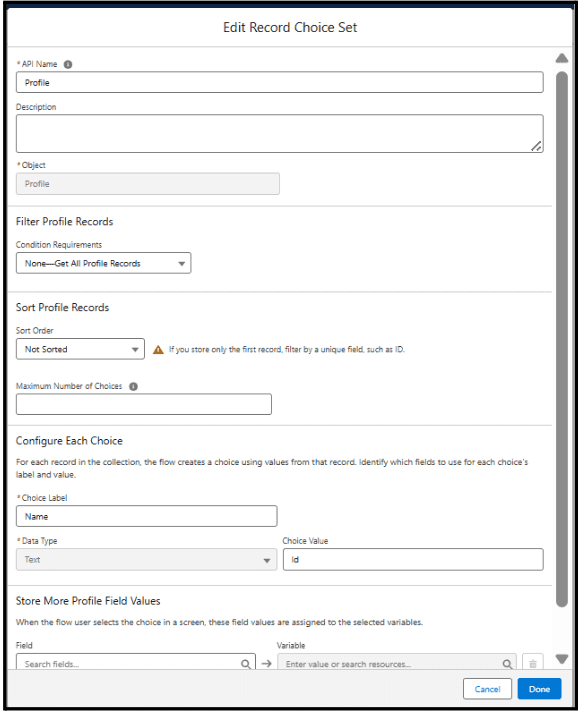
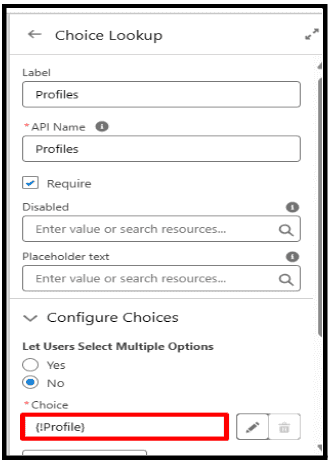
5.6. Configure Profile Selection
5.6.1. Profile: Create a Record Choice Set and add it to make Profile a choice lookup component.
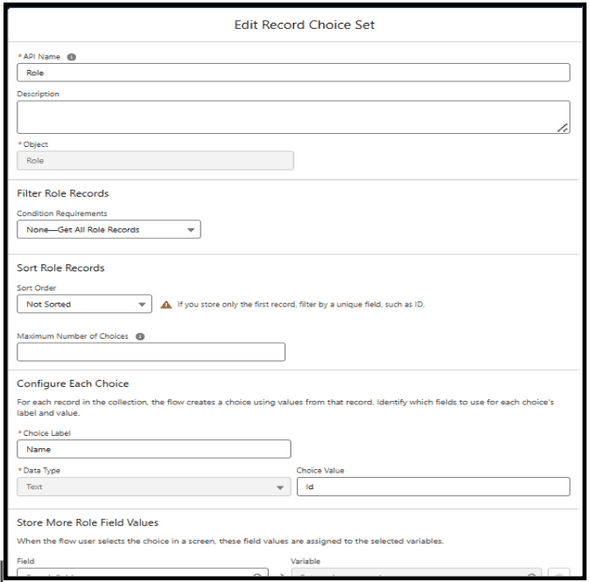
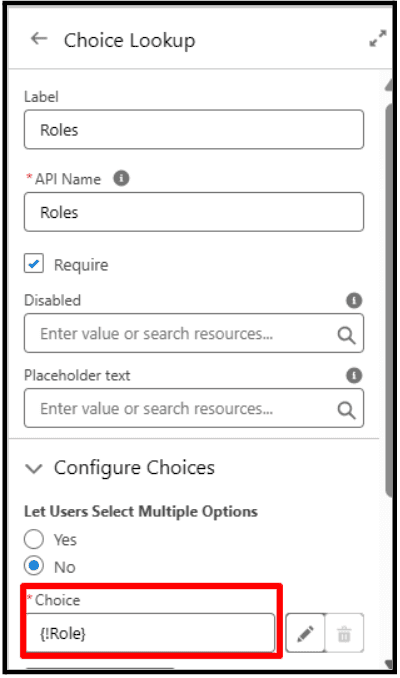
5.7. Configure Role Selection
5.7.1. Role: Create a Record Choice Set and add it to make Role a choice lookup component.
6. Create Formulas for Alias, Username & Nickname
To auto-generate user details, follow these steps to create three formula fields: Alias, Username, and Nickname.
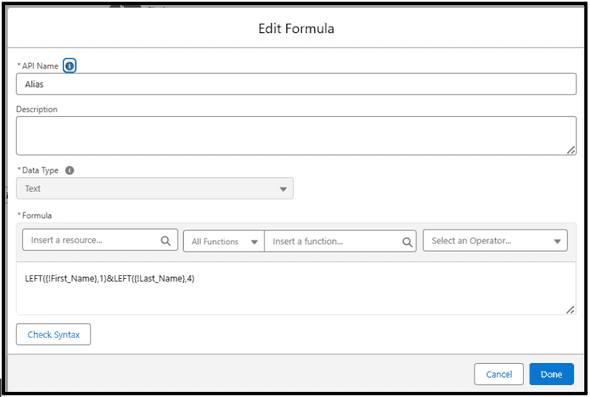
6.1. Create Alias Formula
** Steps:**
6.1.1. In Flow Builder, click New Resource.
6.1.2. Select Formula as the resource type.
6.1.3. Enter the API Name as Alias.
6.1.4. Set the Data Type to Text.
6.1.5. In the formula editor, enter the following formula:
Alias Formula : LEFT({!First_Name},1)&LEFT({!Last_Name},4)
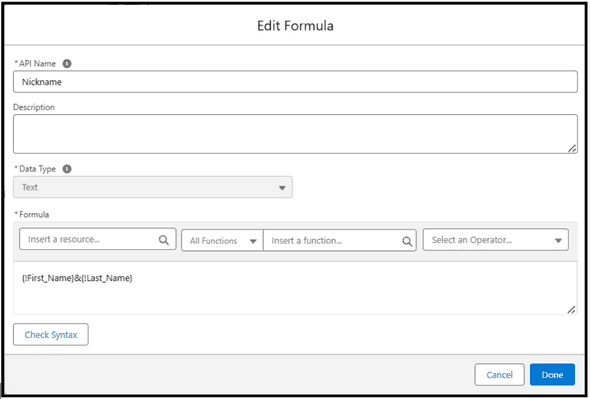
6.2. Create Nickname Formula
Steps:
6.2.1. In Flow Builder, click New Resource.
6.2.2. Select Formula as the resource type.
6.2.3. Enter the API Name as Nickname.
6.2.4. Set the Data Type to Text.
6.2.5. In the formula editor, enter the following formula:
Nickname Formula : {!First_Name}&{!Last_Name}
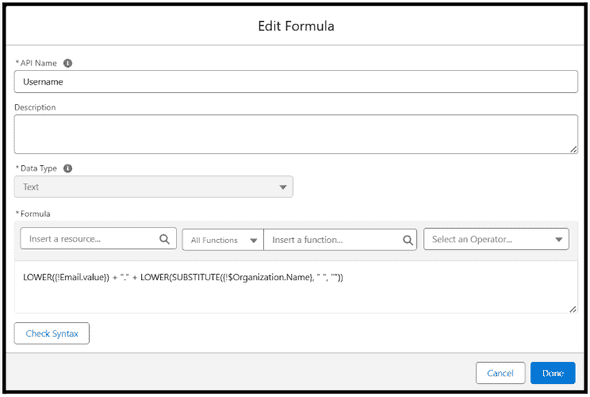
6.3. Create Username Formula
** Steps:**
6.3.1. In Flow Builder, click New Resource.
6.3.2. Select Formula as the resource type.
6.3.3. Enter the API Name as Username.
6.3.4. Set the Data Type to Text.
6.3.5. In the formula editor, enter the following formula:
Username Formula : LOWER({!Email.value}) + "." + LOWER(SUBSTITUTE({!$Organization.Name}, " ", ""))
7. Create the User Record
7.1. Select (+) icon and Select Create Records Element.
8. Reset the User Password
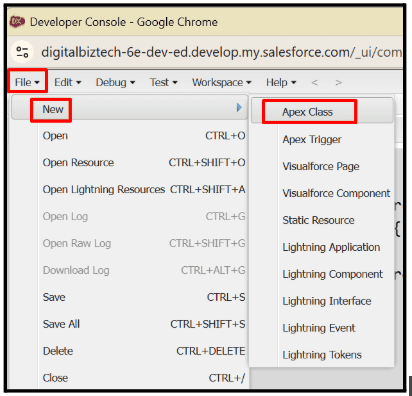
8.1. Create an Apex Class for password resets.
8.2. Steps to Create the Apex Class
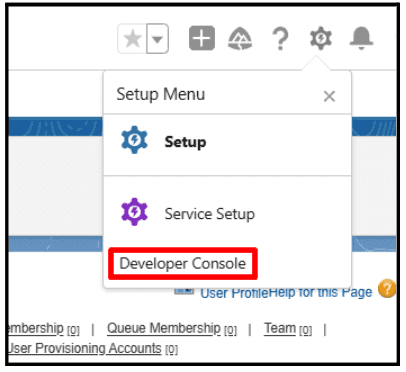
8.2.1. Click the Gear icon and select Developer Console.
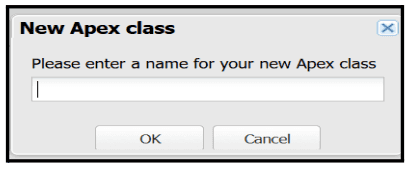
8.2.2. Enter the Apex class name and add the following code :
Apex class :
public class HR {
@InvocableMethod
public static void resetPassword(List
for (Id userId : userIds) {
if (userId != null) {
System.resetPassword(userId, true); // Set to false to avoid sending email
} else {
System.debug('User ID is null!');
}
}
}
}
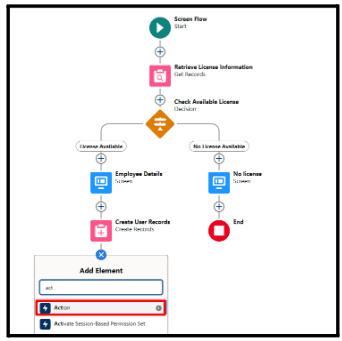
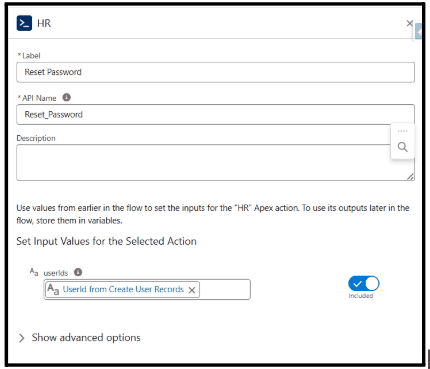
8.2.3. Add an action to reset the password:
8.2.3.1. Select (+) icon and Select Action.
9. Display Success Message
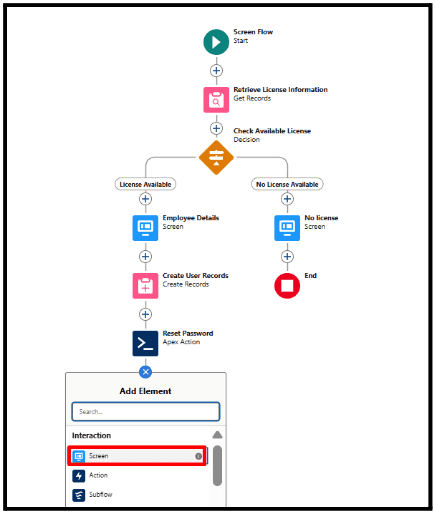
9.1. Add a Screen Element.
9.1.1. Select the (+) icon and choose Screen.
9.1.2. Name the screen Display Success Message.
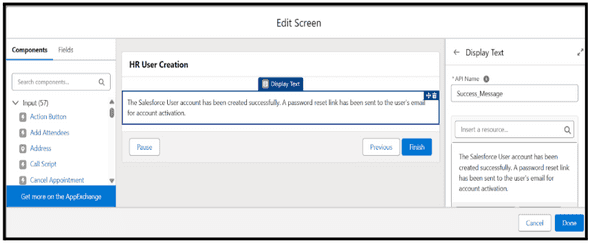
9.2. Add a Display Text Component
9.2.1. Click Add Component → Select Display Text.
9.2.2. Label: SuccessMessage.
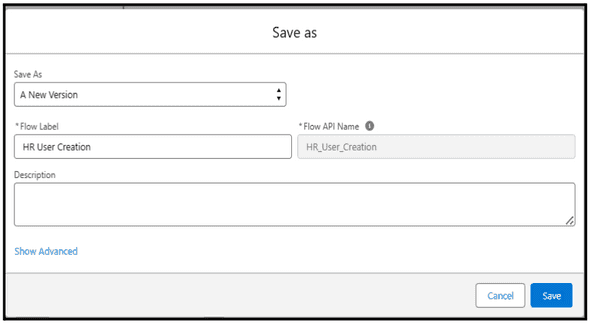
9.2.3. Click Done, Save as New version.
9.2.4. Click Activate.
Steps to Create Employee Record Using Record-Triggered Flow
1. Create a New Flow
1.1. Navigate to Setup and Search for Flows in the Quick Find box.
1.2. Click New Flow.
1.3. Select Record-Triggered Flow and click Create.
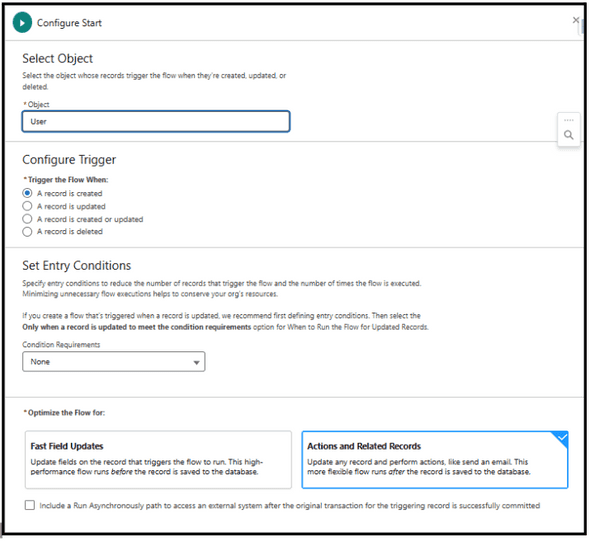
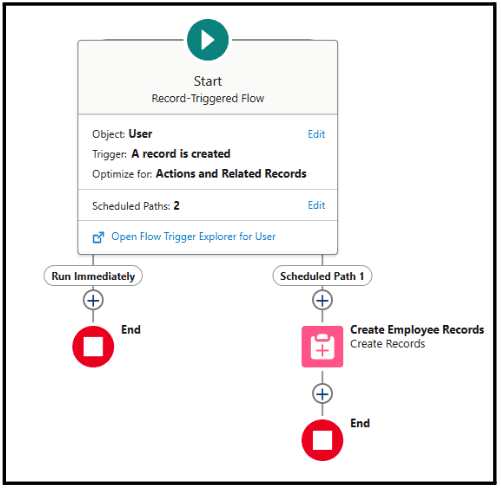
2. Configure Flow Start Conditions
2.1. Object: Select User.
2.2. Trigger: Set it to A record is created.
2.3. Optimize For: Choose Actions and Related Records.
2.4. Click Done.
3. Define Flow Paths
Salesforce provides two execution paths:
3.1. Immediate Path: Executes actions immediately after the record is created.
3.2. Scheduled Path: Delays the execution by a defined period.
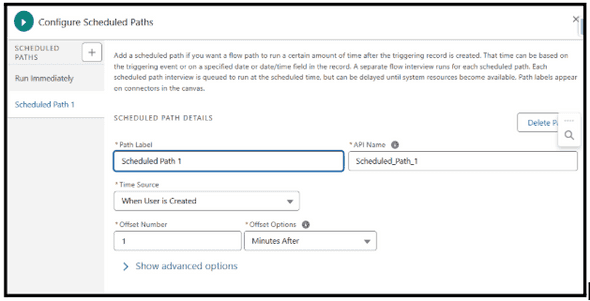
4. Adding a Scheduled Path (Optional)
4.1. Click + Add Scheduled Paths and Set Delay (1 minute).
4.2. This ensures Employee creation is slightly delayed to avoid conflicts with license provisioning.
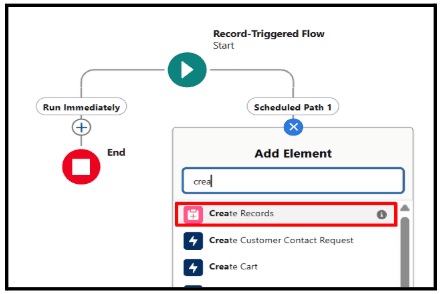
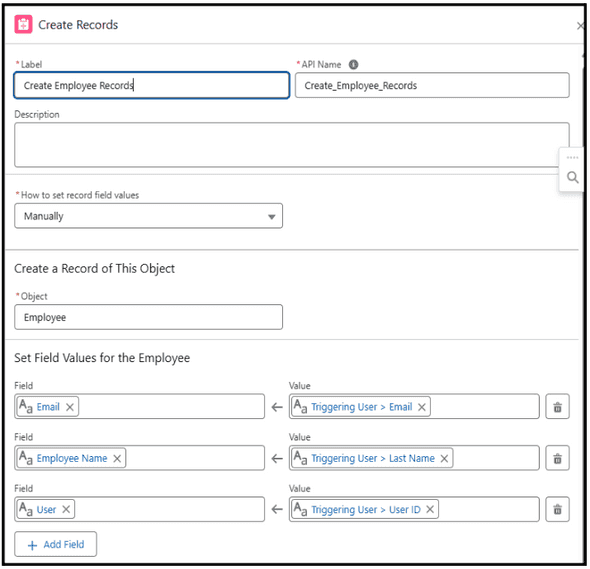
5. Create Employee Record
5.1. Click (+) → Select Create Records.
5.2. Label: Create Employee Records.
5.3. API Name: Create_Employee_Records.
5.4. How Many Records to Create? Select One.
5.5. How to Set the Record Fields? Choose Use Separate Resources and Literal Values.
5.6. Object: Select Employee.
5.7. Click Done.
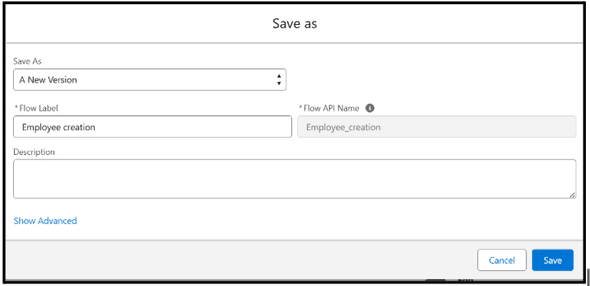
5.8. Click save as a new version.
5.9. Click Save and Activate.
6. How to Add a Screen Flow to the Home Page in Salesforce
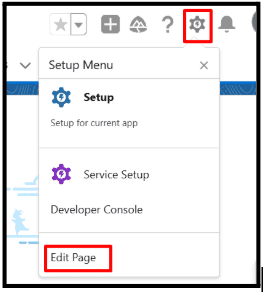
6.1. Add the screen flow to the Home page by clicking Edit Page.
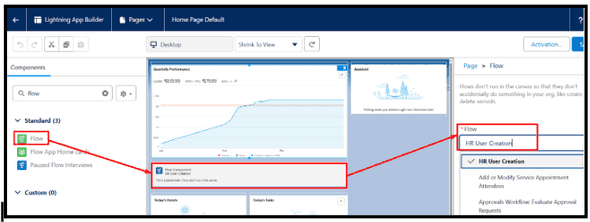
6.2. Drag and drop the Flow, select Screen Action Flow, and finally, Save and Activate it.
Output :
User Interface - HR User Creation Screen
- If License is available, HR user creation screen is displayed in the Home page.
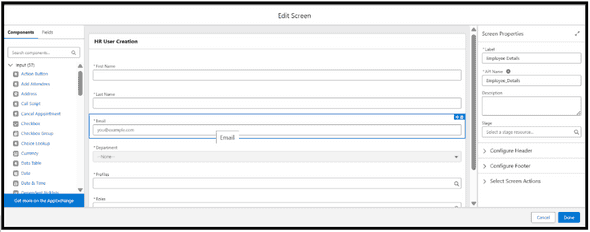
1.1. When HR teams access the HR User Creation Screen, they will see the following screen to enter employee details:
- This screen allows users to:
2.1. Enter the First Name, Last Name, and Email of the new employee.
2.2. Select the Department from a dropdown menu.
2.3. Choose the appropriate Profile and Role using a choice lookup search.
2.4. Click Next to proceed with user creation.
2.5. After the user is created, they will receive an email with a reset password link.
2.6. After clicking Next, the user can see a success message.
2.7. After the user is successfully created, the employee record will be automatically generated after one minute.
- If License is not available user will see a screen indicating no salesforce licenses available.
Conclusion :
This automated Salesforce user creation flow simplifies onboarding by ensuring license availability before proceeding. It reduces manual effort, minimizes errors, and enhances efficiency. With dynamic profile and role selection, the process becomes more flexible and user-friendly. Overall, it streamlines user management and improves operational productivity.








Leave a Comment