Screen Flow
Salesforce Screen Flow is a powerful declarative tool that empowers users to intuitively design and automate dynamic business processes within the Salesforce platform without needing to write code.
Screen Flow is like a smart assistant that helps you create step by step guides for getting things done. It is super easy to use screen flow just by dragging and dropping elements to build a flow that guides users through different screens.
Data Table Component
The data table component enables users to easily view and interact with information by presenting data in a tabular format.
It allows users to sort and filter data based on specific criteria. This functionality makes it easier to find relevant information.
Requirement
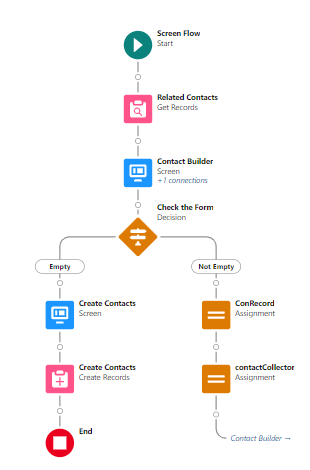
We are going to create a screen flow which mainly uses a data table to display the newly added contacts on the account page. The screen will showcase a contact form, positioned just below which there will be a data table presenting the recently added contact. Following that, another data table will exhibit all existing contacts.
Users will input information into the form, and upon clicking Next, the entered data will populate the respective data table. The subsequent screen will offer a choice to specify which newly added contacts to be displayed.
Steps to achieve the Requirement
-
Create a Screen Flow
-
Add Get Record element to fetch related Contacts
-
Create a Screen and add Data Table Component
-
Add a Decision Element to check weather the form is empty or not
4.1 If Empty Add a Screen element and a Create Records element to create Contacts
4.2 If Not Empty Add an Assignment element to collect the contacts
4.3 Connect the Elements
-
Test the Flow
1. Create a Screen Flow
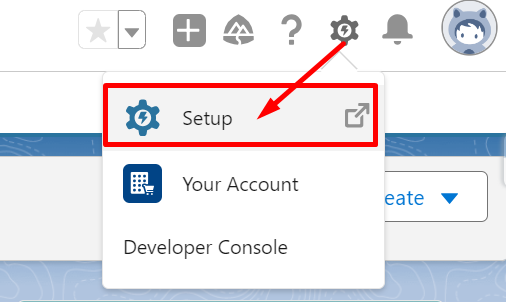
1.1. Login to Salesforce, and in your Salesforce org click the Gear icon and select Setup.
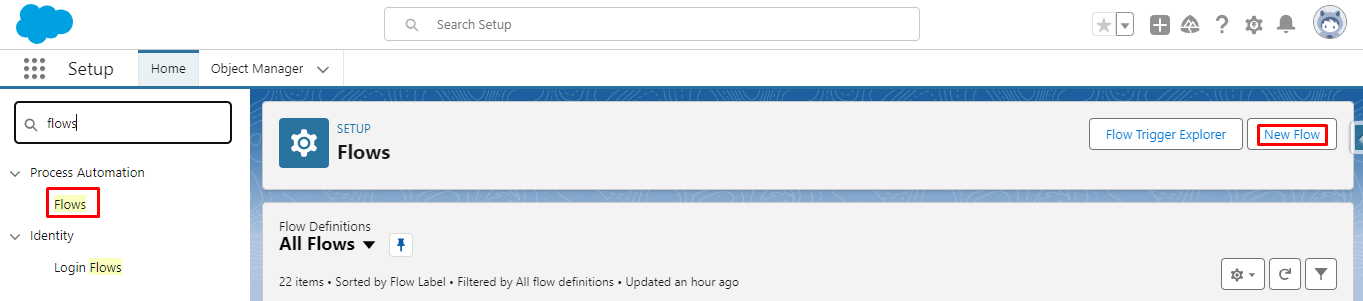
1.2. In the Quick find box find and click the Flows and then click New Flow.
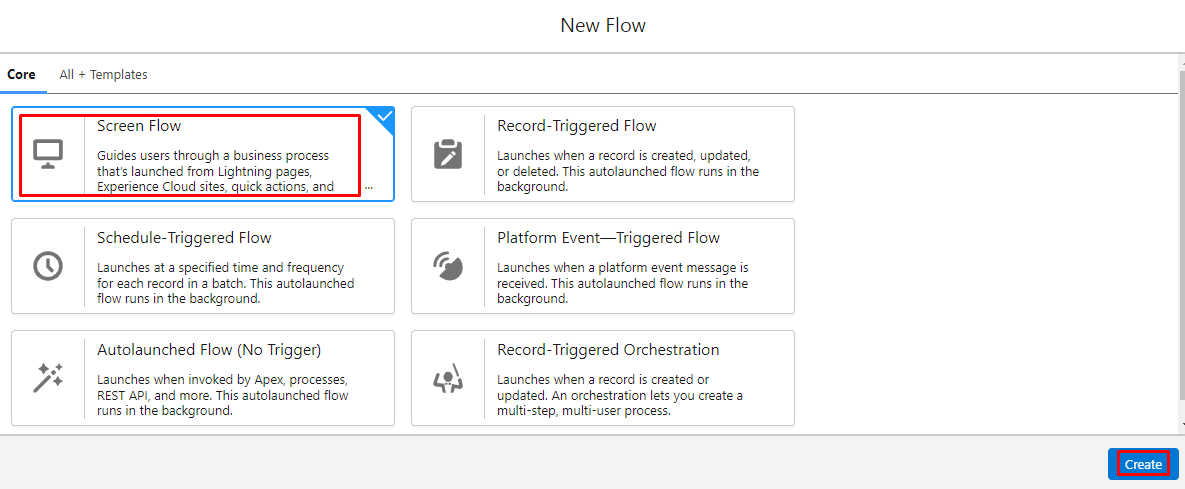
1.3. Click the Screen Flow and then click Create.
2. Add Get Record element to fetch related Contacts
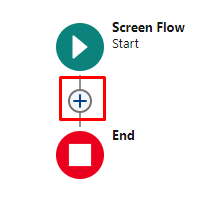
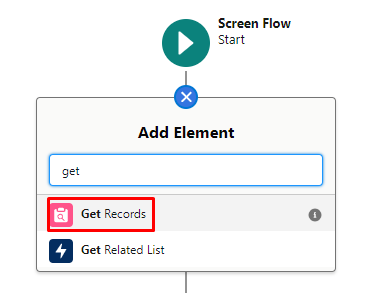
2.1. Click the (+) icon below the Start element.
2.2. In the Search box type Get Records to add the Get Records elements and click it.
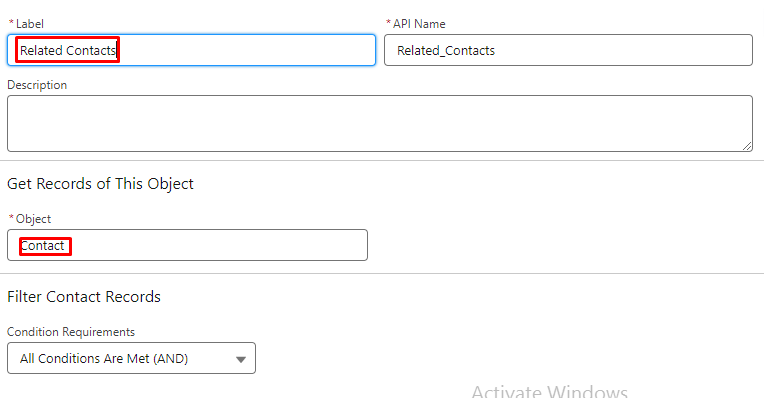
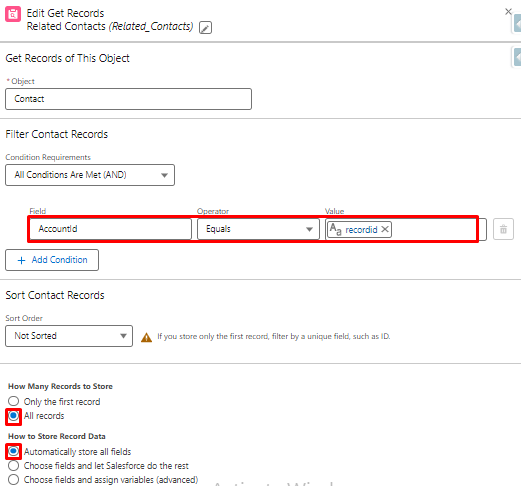
2.3. Fill the Label as Related Contacts and in Object choose Contact.
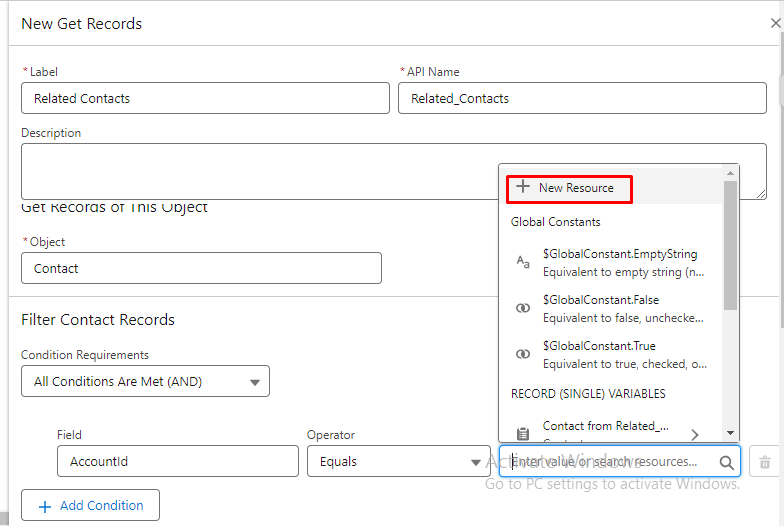
2.4. Fill the required information
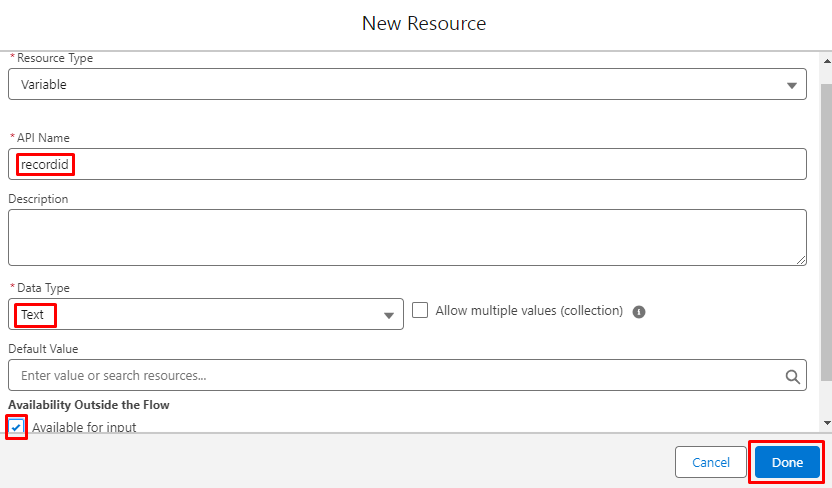
2.4.1. The value of the Field is filled by creating a New Resources.
2.4.2. Choose the Resource Type as variable.
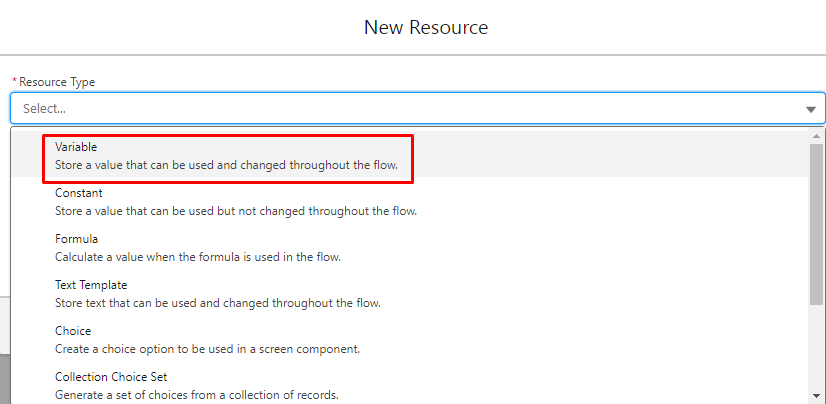
2.4.3. The API name is recordid, the Data type is Text and the Available for Input checkbox is enabled, and then click Done.
2.4.4. Now fill the required field with operator and value
2.4.4.1. AccountId ->Equals ->recordid
2.4.4.2. Enable All records and Automatically store all field checkboxes.
3. Create a Screen and add Data Table Component
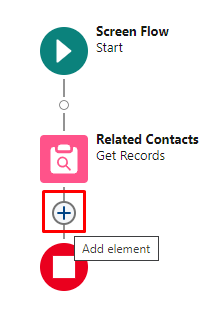
3.1. Click the (+) icon below the Get Record element.
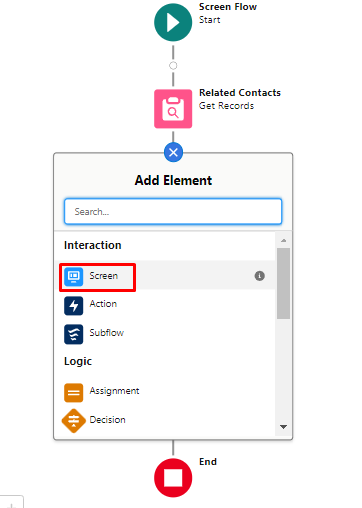
3.2. In the Search box type Screen to add the Screen elements, and then click it.
3.3. Give the Screen Label as Contact Builder.
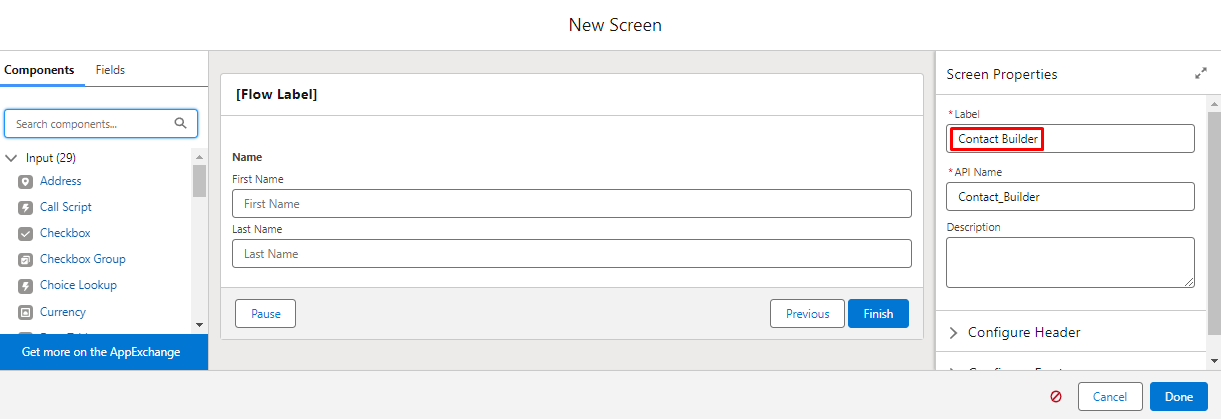
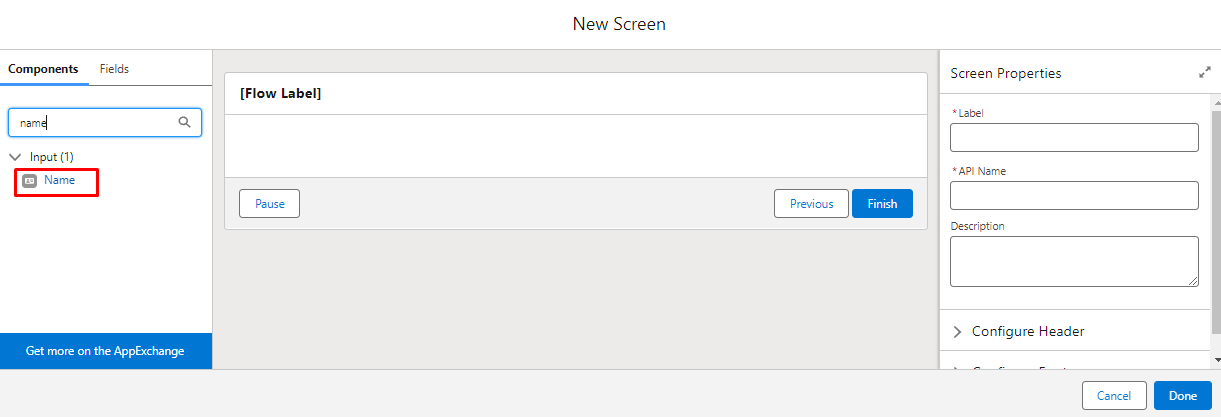
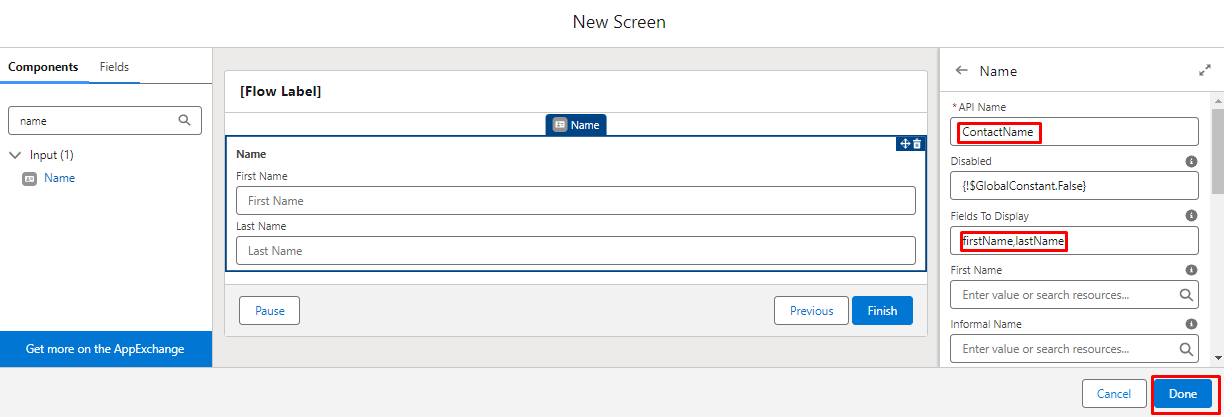
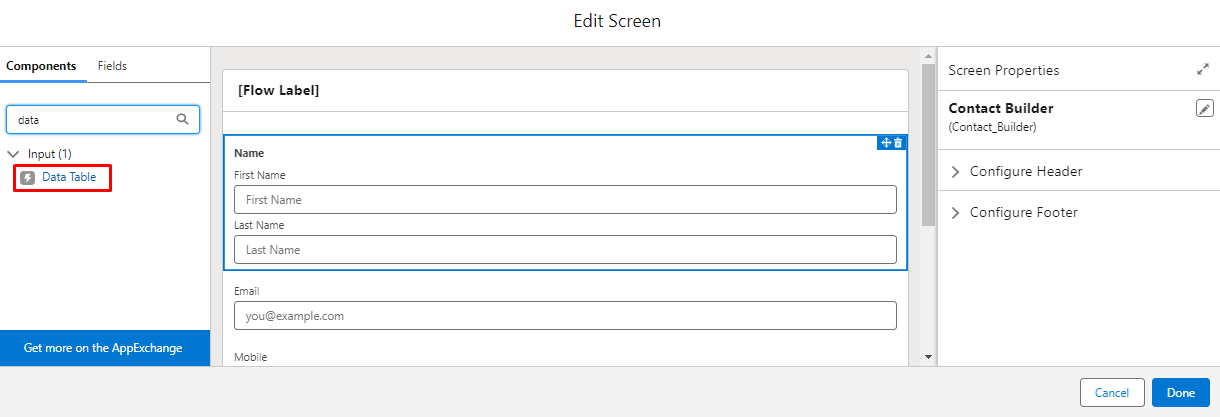
3.4. In the Components section type Name, and drag and drop the Name component inside the Screen
3.5. Give the API name as ContactName and click Done.
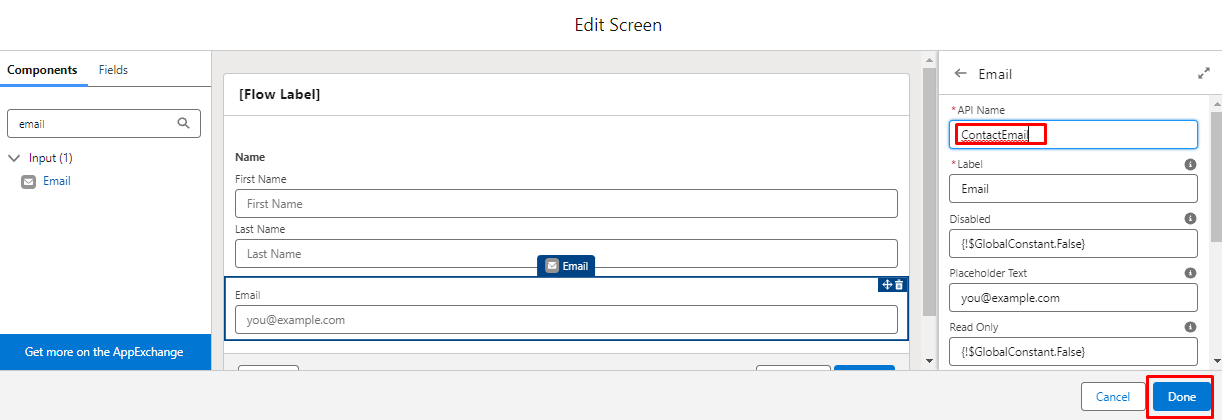
3.6. Similarly in the Components section type Email, and drag and drop the Email component inside the Screen.
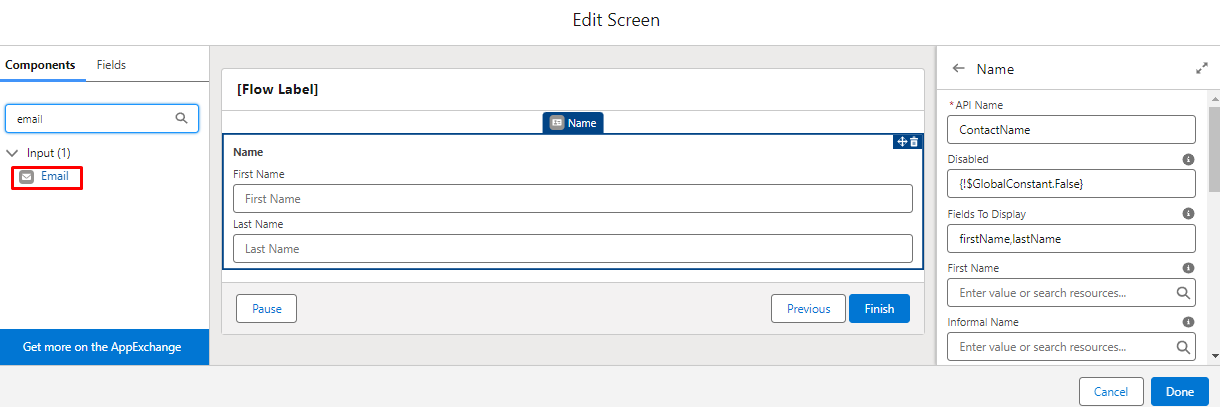
3.7. Give the API name as ContactEmail and the Label as Email and click Done.
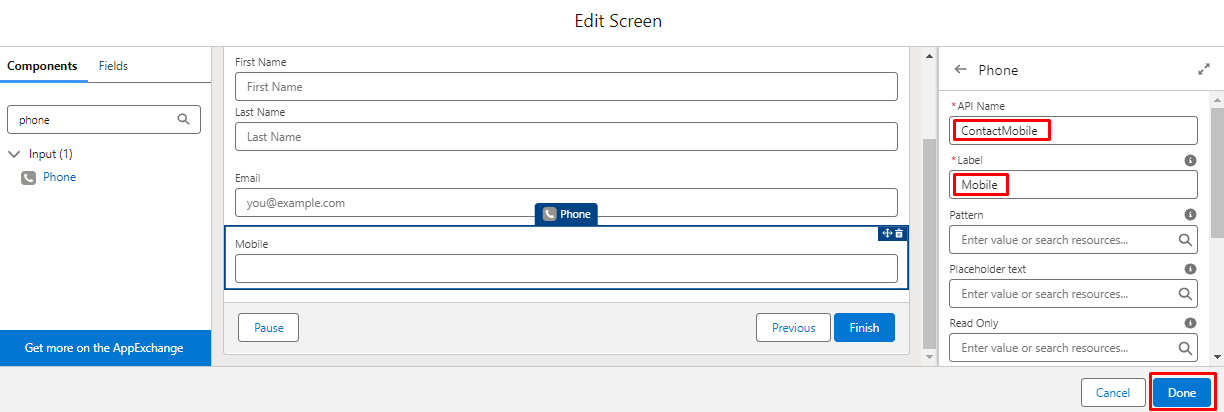
3.8. Similarly in the Components section type Phone, and drag and drop the Phone component inside the screen.

3.9. Give the API name as ContactMobile and the label as Mobile and click the Done option.
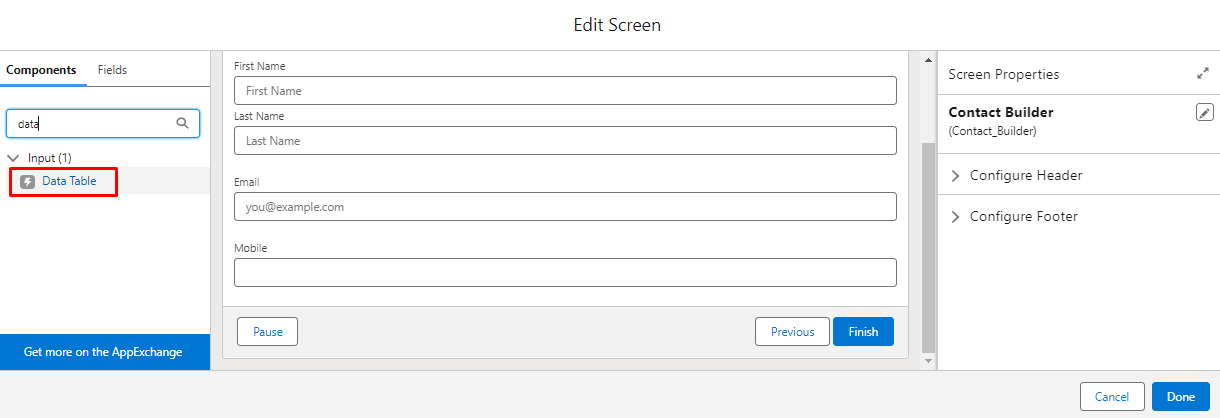
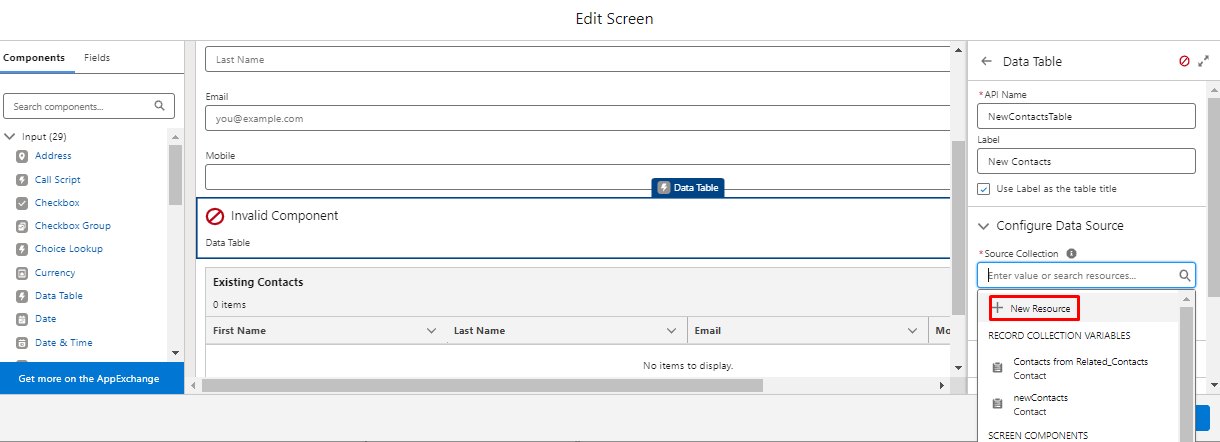
3.10. Now in the Components section type Data Table, and drag and drop the Date Table component below the Screen element.
3.11. Give the API name as NewContactsTable and the label as New Contacts and enable Use Label as data table title checkbox.
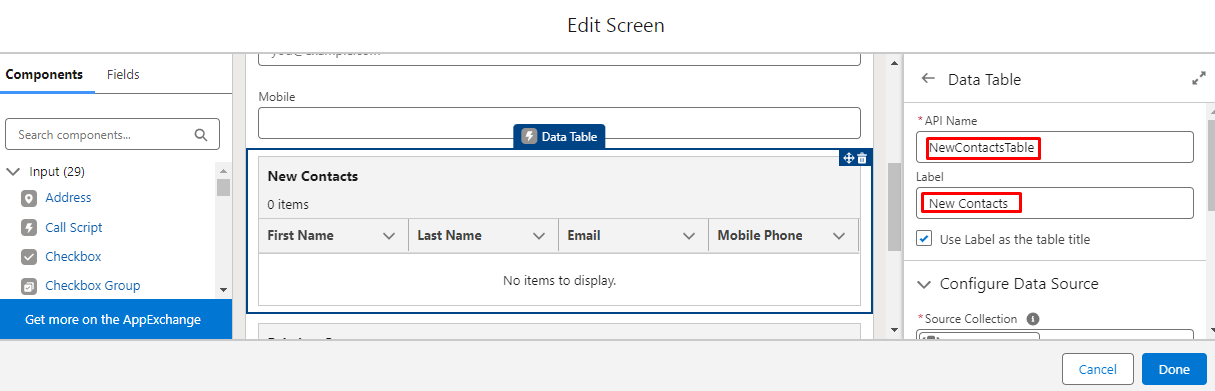
3.12. For Source Collection create New Resource.
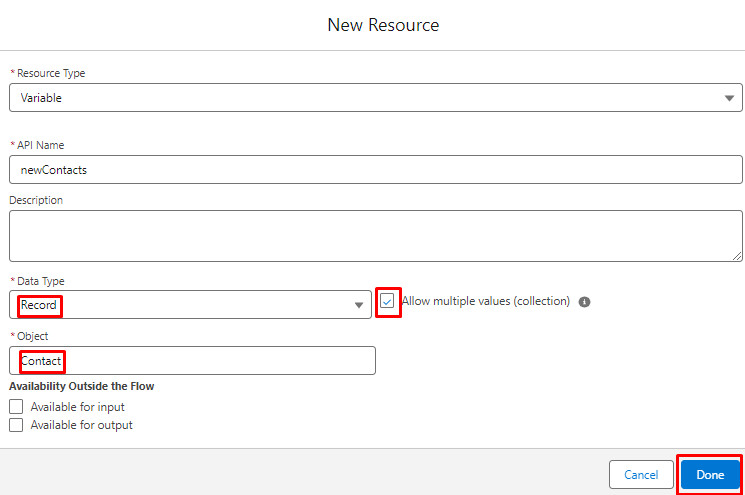
3.13. The Resource Type is variable and the API name is newContacts, the Data Type is Record and the Object is Contact
3.13.1. Enable the Allow Multiple value checkbox, and then click Done.
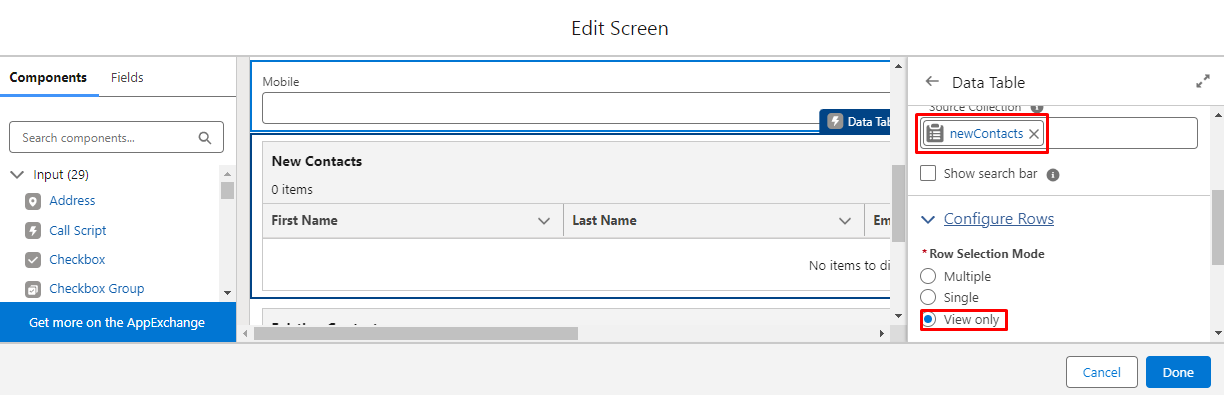
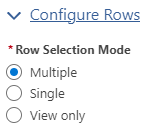
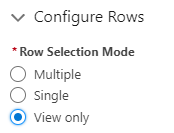
3.14. Now choose the Source Collection as newContacts and configure the Row selection mode as View only.
3.15. To configure Column we should add at least one field.
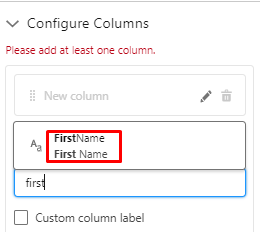
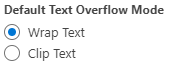
3.16. Choose the source field as FirstName and enable Wrap Text and click Done.
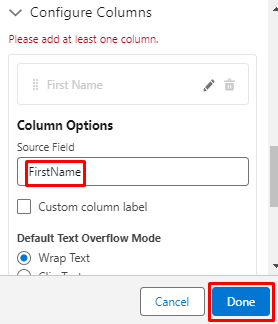
3.17. Click Add Column and choose the Source field as LastName and click Done.
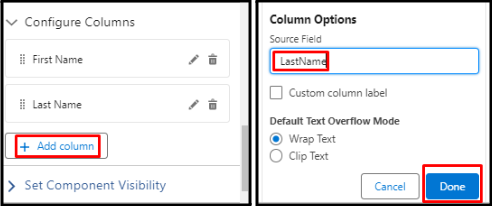
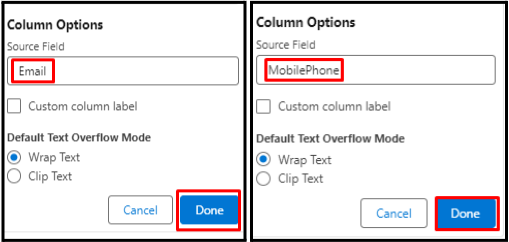
3.18. Similarly add Email and MobilePhone and click Done.
3.19. Now in the Components section type Data Table, and drag and drop the Date Table component below the Screen element.
3.20. Give the API name as ExistingContactsTable and the Label as Existing Contacts and enable Use Label as data table title checkbox.
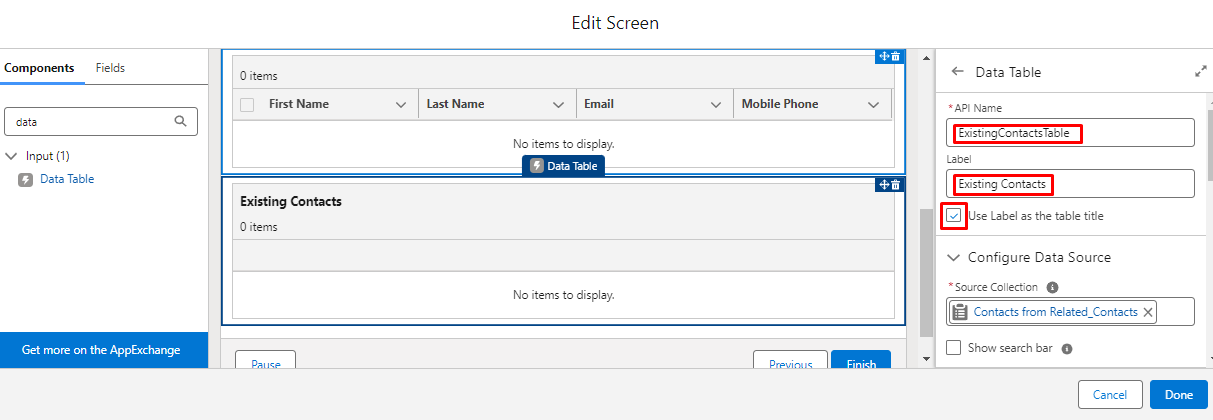
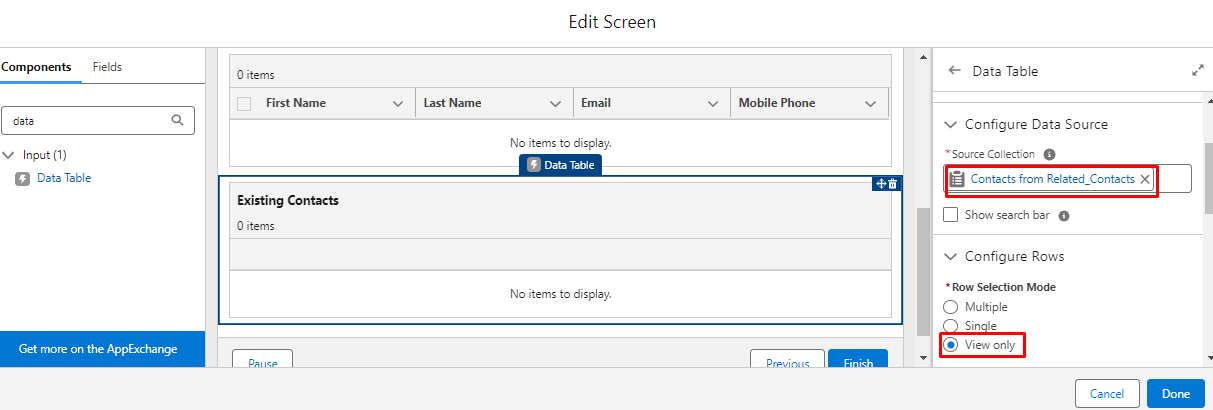
3.21. For Source Collection choose Contacts from Related Contacts and enable View only mode for Row selection.
3.22. Choose the source field as FirstName and enable Wrap Text and click Done.
3.22.1. Then Add Column and choose the Source field as LastName and click Done.
3.22.2. Similarly add Email and MobilePhone and click Done.

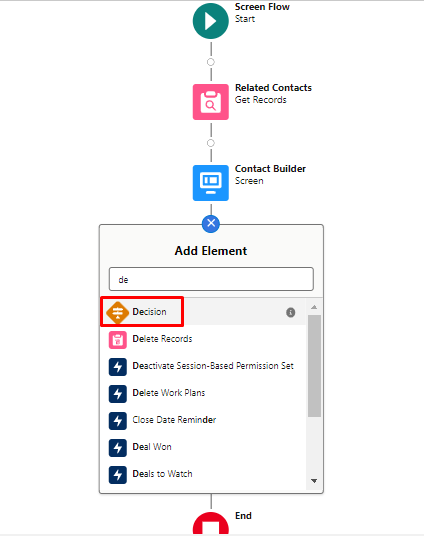
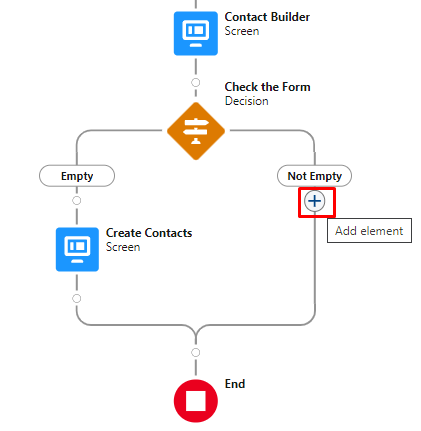
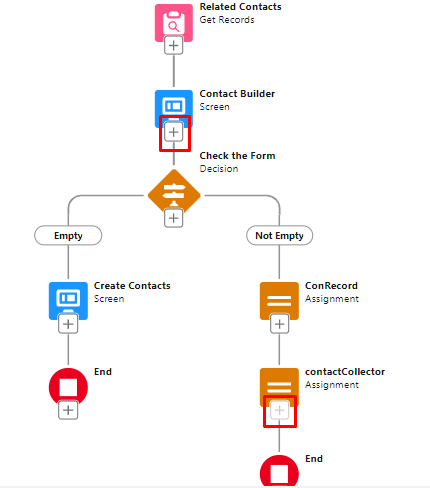
4. Add a Decision Element to check weather the form is Empty or Not Empty
4.1 If Empty Add a Screen element and a Create Records element to create Contacts
4.1.1. Click the (+) icon below the Screen element.
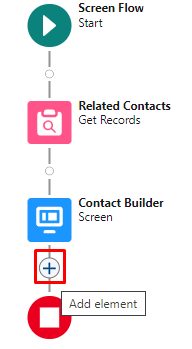
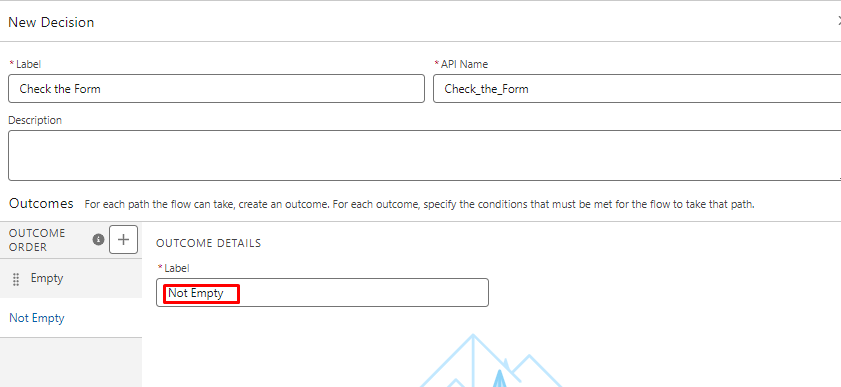
4.1.2. In the Search box type Decision to add the Decision elements and label it Check the Form.
4.1.3. Type the Label as Empty
4.1.3.1. ContactName.firstName->Is Null->True
4.1.3.2. ContactName.lastName->Is Null->True
4.1.3.3. newContacts->Is Null->False
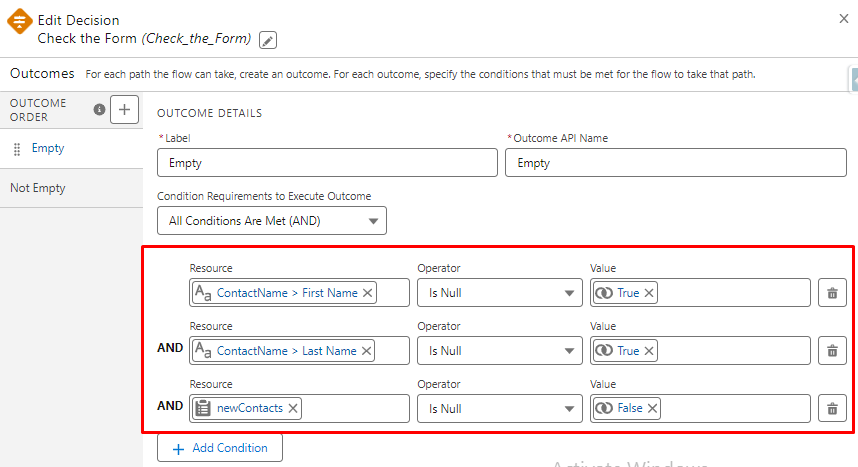
4.1.4. In the other side of Decision element Label as Not Empty
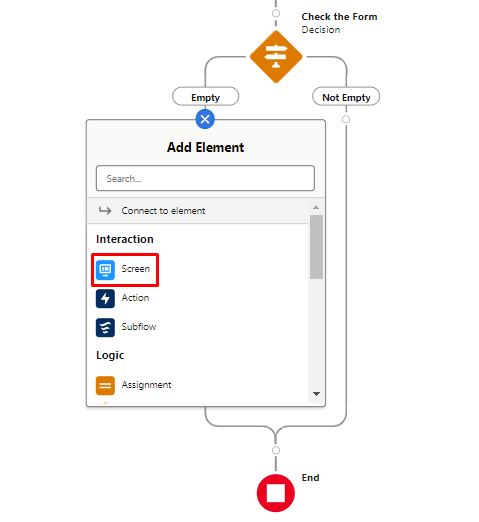
4.1.5. Click the (+) icon below the Empty of the decision element.
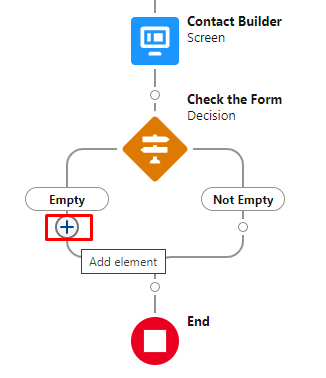
4.1.6. Add a Screen element by searching it in the Search box and click the screen.
4.1.7. Name the Screen Label as Create Contacts.
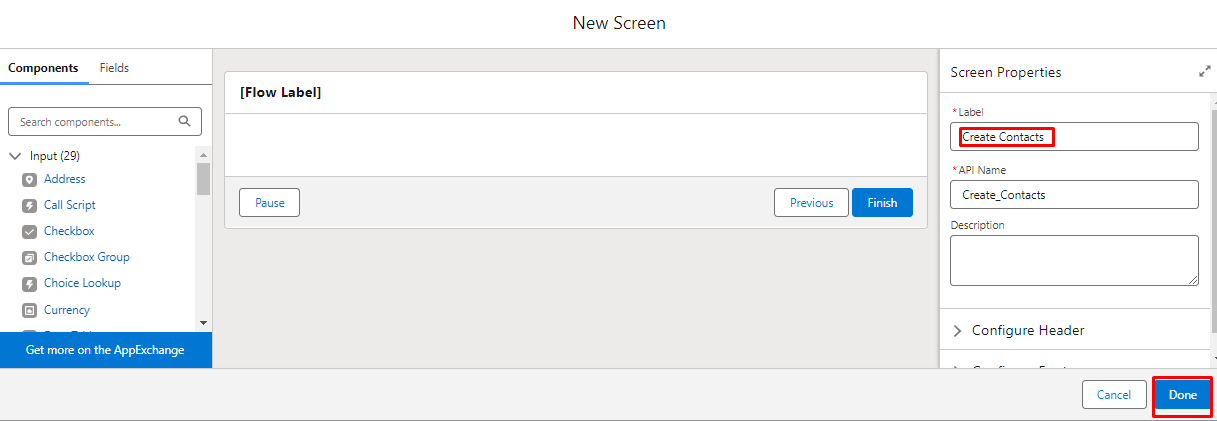
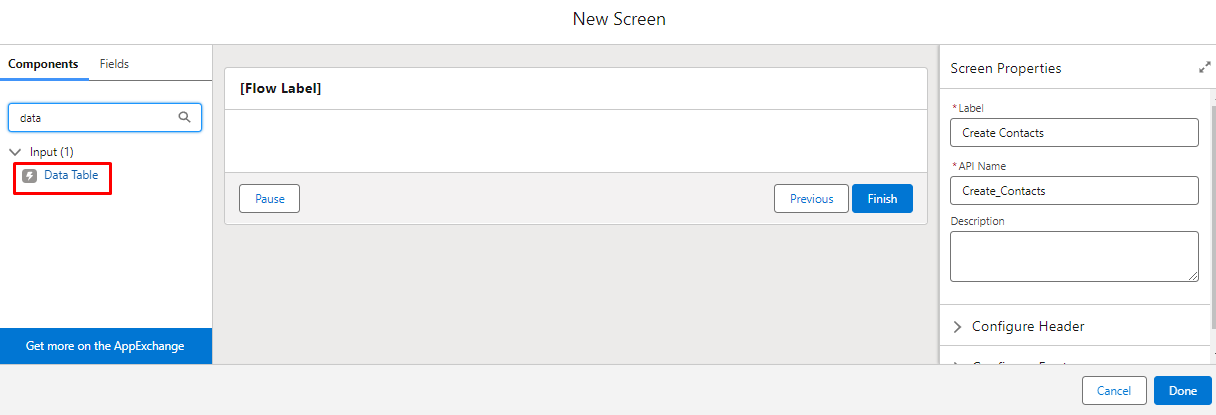
4.1.8. In the Components section type Data Table, and drag and drop the Date Table component below the Screen element.
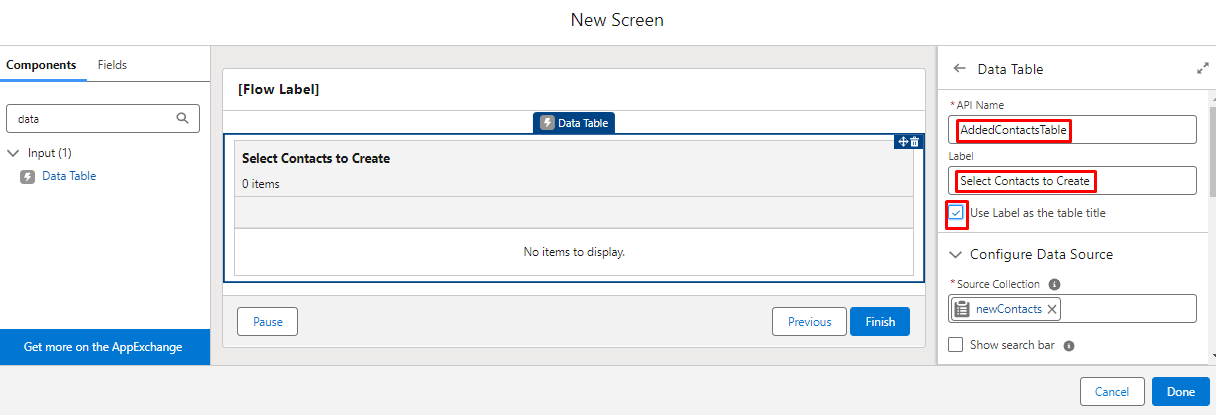
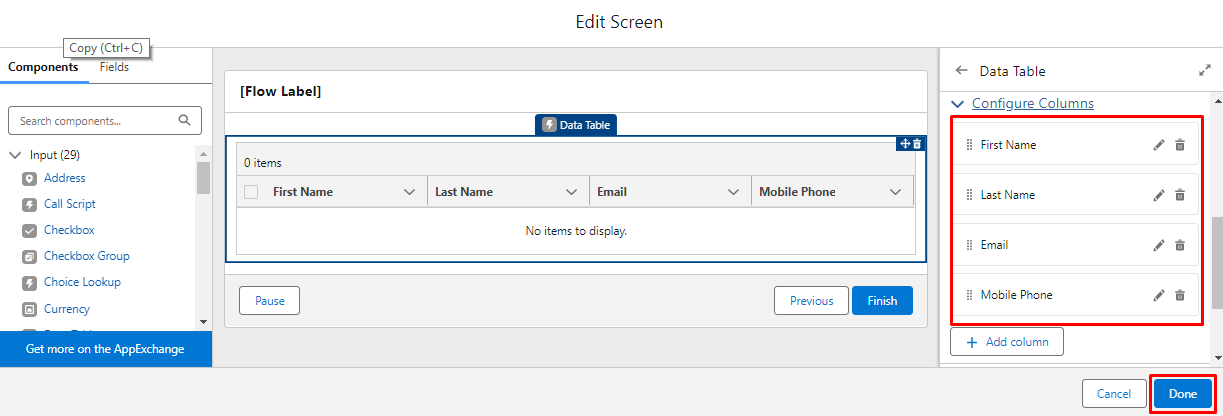
4.1.9. Give the API name as AddedContactsTable and the Label as Select Contacts to Create, and enable Use Label as data table title checkbox.
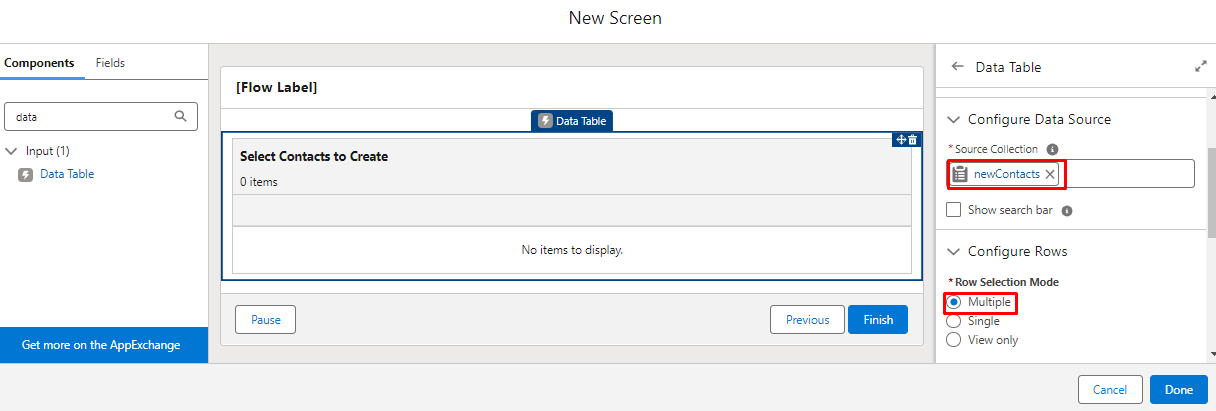
4.1.10. Now choose the Source Collection as newContacts and configure the Row selection mode as Multiple.
4.1.11. Choose the source field as FirstName and enable Wrap Text and click Done.
4.1.11.1. Click Add Column and choose the Source field as LastName and click Done.
4.1.11.2. Similarly add Email and MobilePhone and click Done.
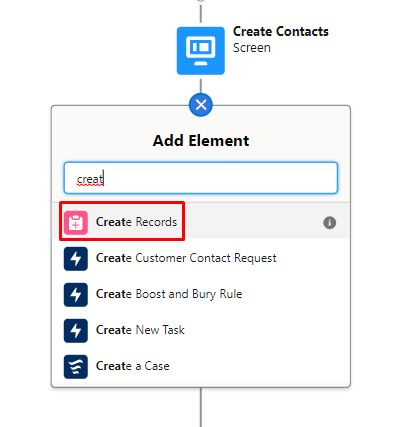
4.1.12. Click on (+) symbol below the Create Contacts screen element and search for the Create Records element and click it.
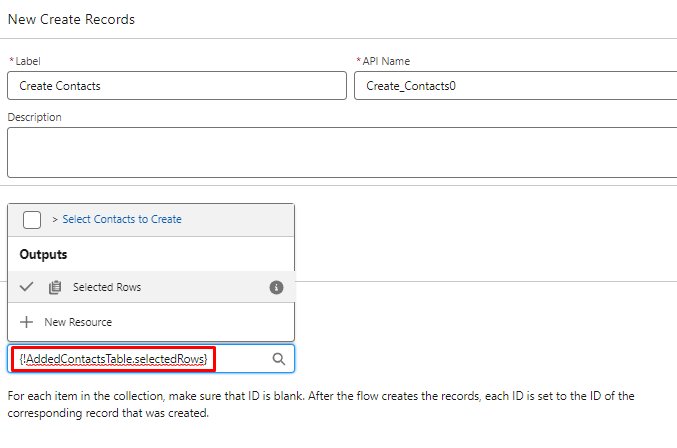
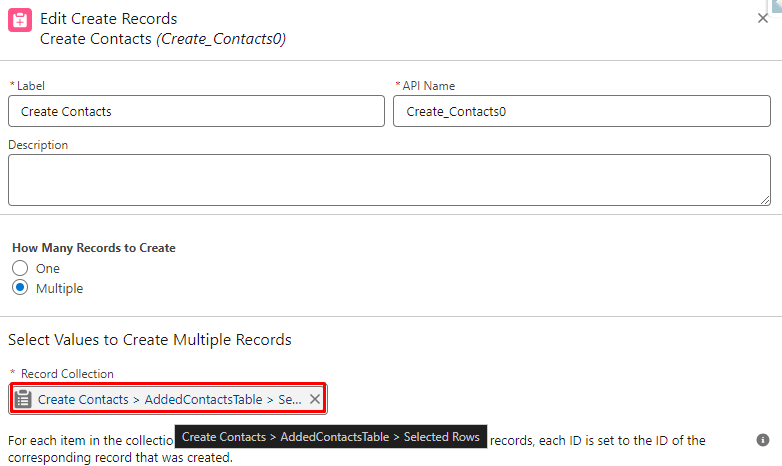
4.1.13. Label the Create Record element as Create Contacts and in Record collection choose AddedContactsTable.selectedRows.
4.1.14. Choose Multiple checkbox to indicate how many records to create.
4.2. If Not Empty Add an Assignment element to collect the contacts
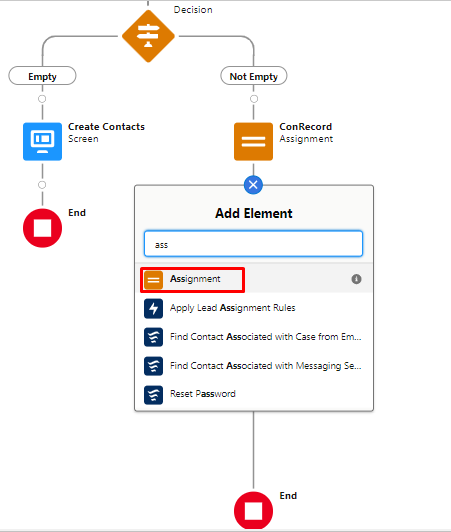
4.2.1. Click the (+) icon below the Not Empty of the decision element.
4.2.2. In the Search box type Assignment to add the Assignment elements and then click it.
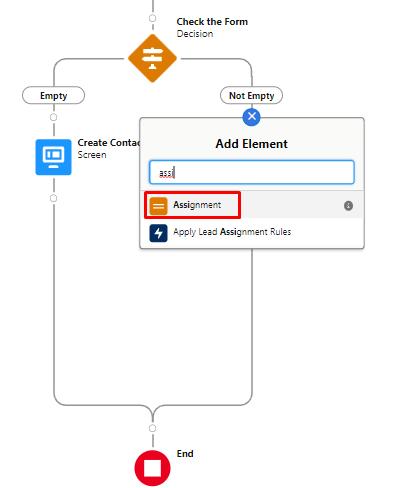
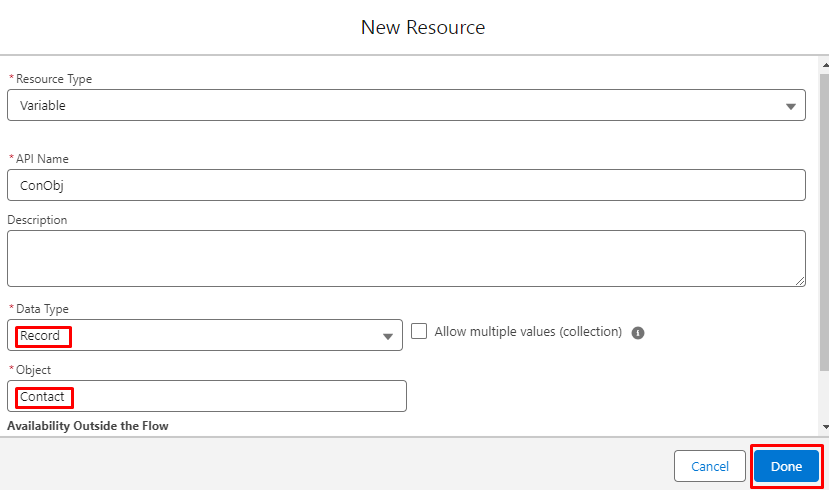
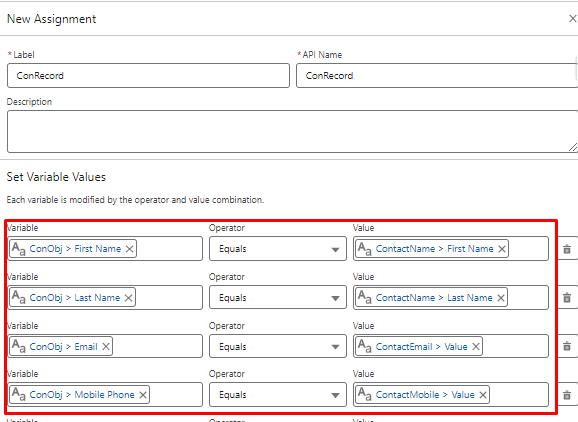
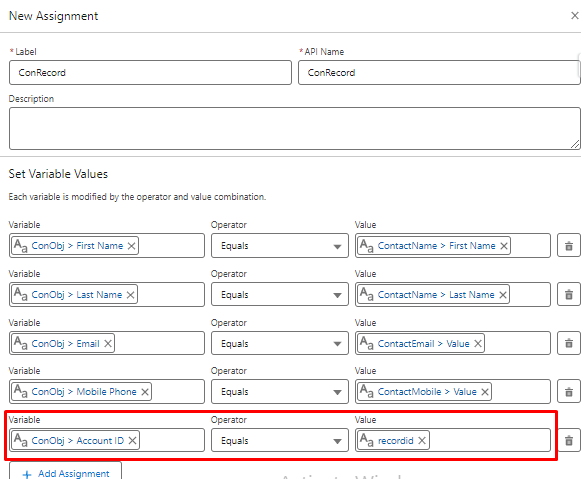
4.2.3. Label the assignment element as ConRecord and create a New Resources.

4.2.4. The Resource Type is variable, the API name is ConObj, which is the short form of Contact Object, the Data type is Record and the Object is Contact, and then click Done.
4.2.5. Set the Variables Values
4.2.5.1. ConObj.FirstName = ContactName.firstName
4.2.5.2. ConObj.LastName = ContactName.lastName
4.2.5.3. ConObj.Email = ContactEmail.value
4.2.5.4. ConObj.MobilePhone = ContactMobile.value
4.2.6. Set the variable to fetch the record
4.2.6.1. ConObj.AccountId->Equals->recordid
4.2.7. Click the (+) icon below the Assignment element.
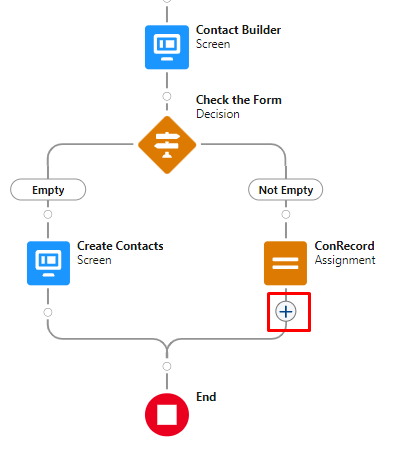
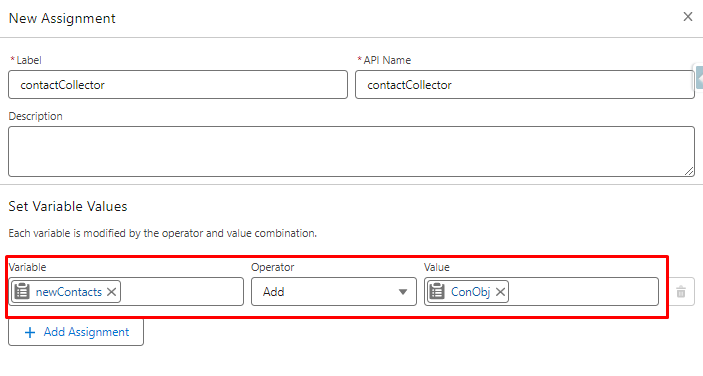
4.2.8. In the Search box type Assignment to add the Assignment elements and then click it.
4.2.9. Label the assignment element as contactCollector and set the variable value as given below
4.2.9.1. newContacts->Add->ConObj
4.3. Connect the Elements
4.3.1. Click the (+) icon below the ContactCollector and click the Connect to element below the Search box.
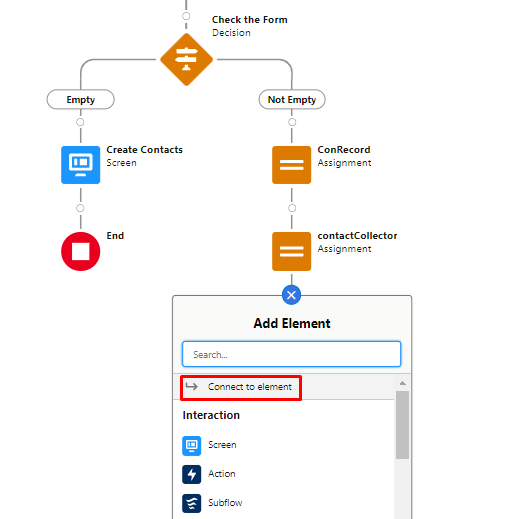
4.3.2. We get [+] symbols in all the Elements.
4.3.3. Click the Contact Builder [+] symbol to connect contactCollector with the Contact builder.
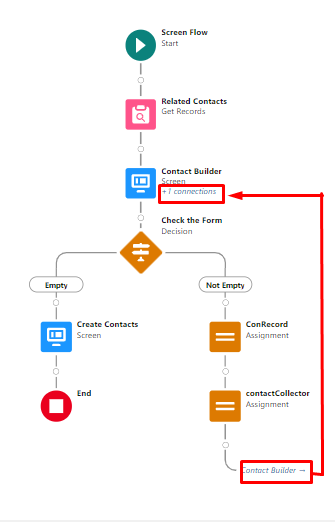
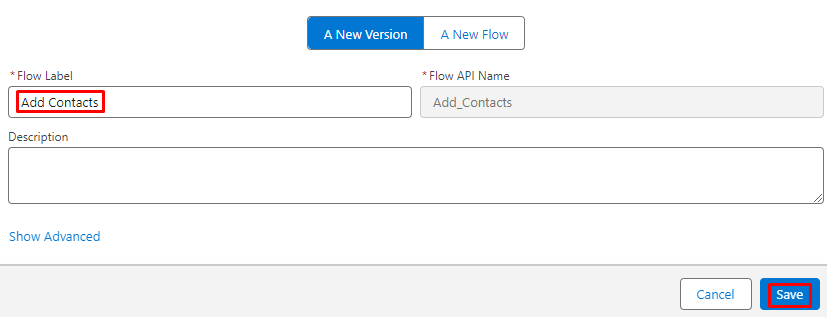
4.3.4. Save the Flow with flow label Add Contacts.
5. Test the Flow
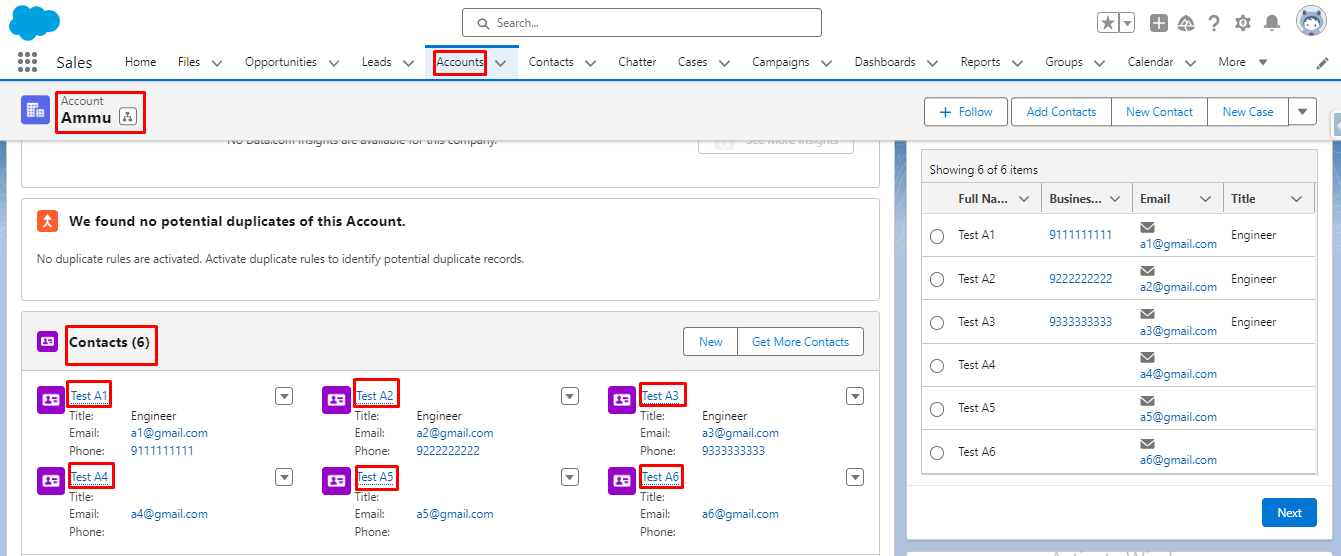
5.1. This is the Screen Flow which uses the data table component to display the newly added contact in the account detail page.
5.2. There are six contacts under a particular account.
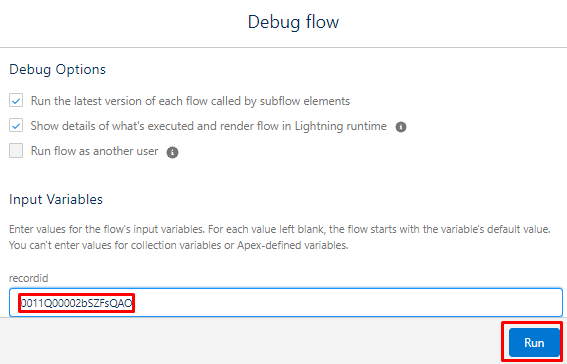
5.3. Now click on the debug option to test the flow.

5.4. Put the particular recordid on which account page the contact needs to be added and click on Run.
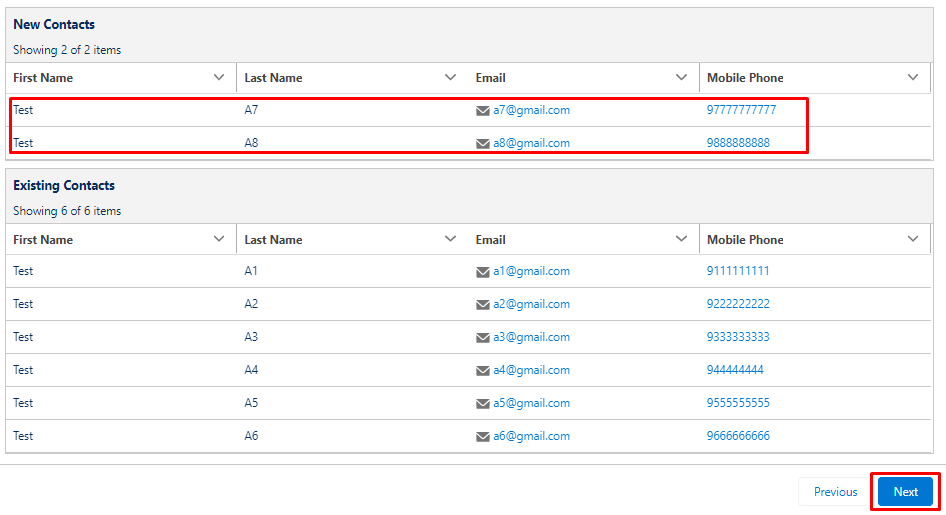
5.5. An empty contact form appears with New contacts and existing contacts data tables.
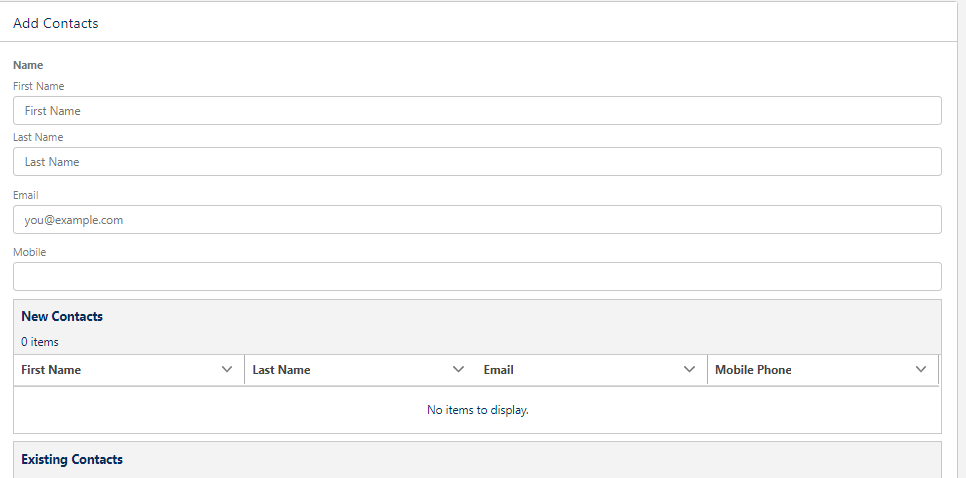
5.6. Now there are no New Contacts added in the data table.
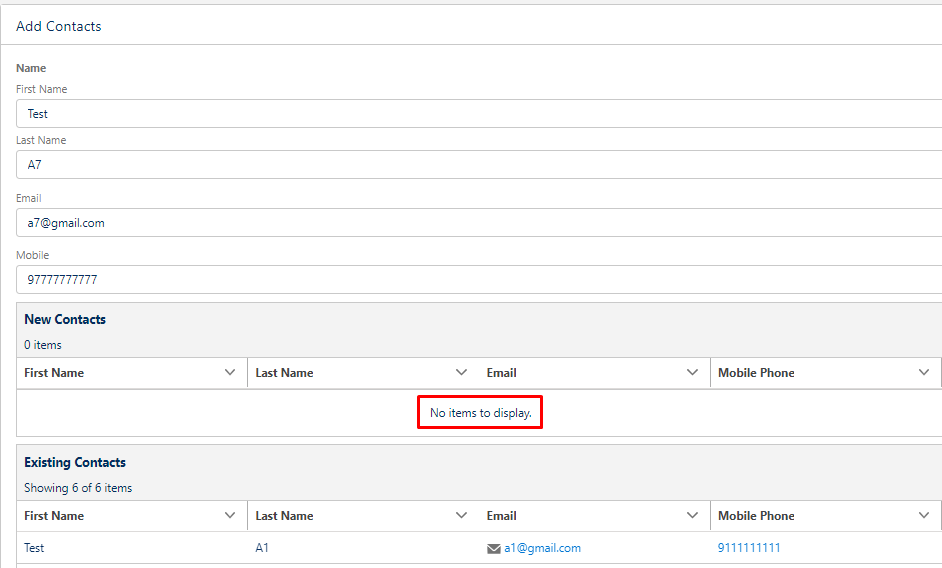
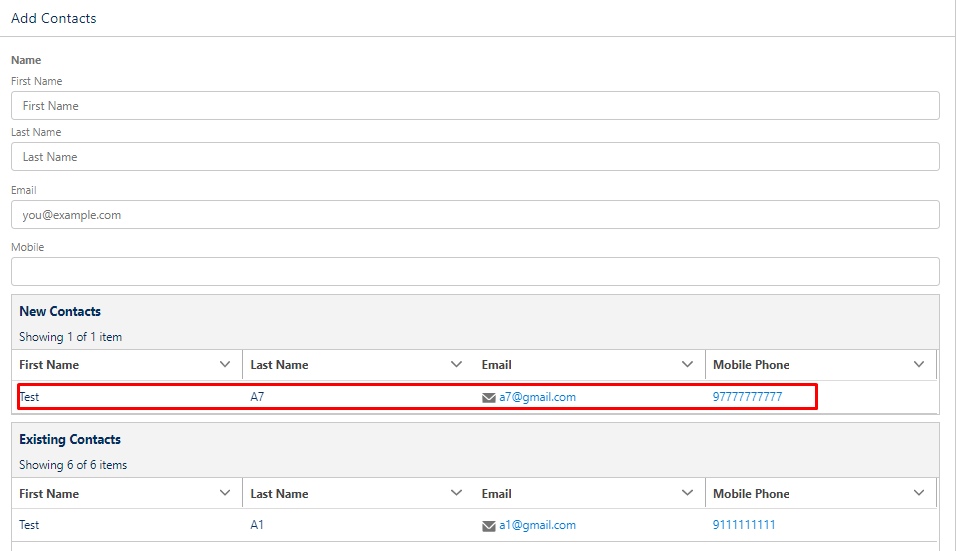
5.7. Now fill the contact form and click Next.
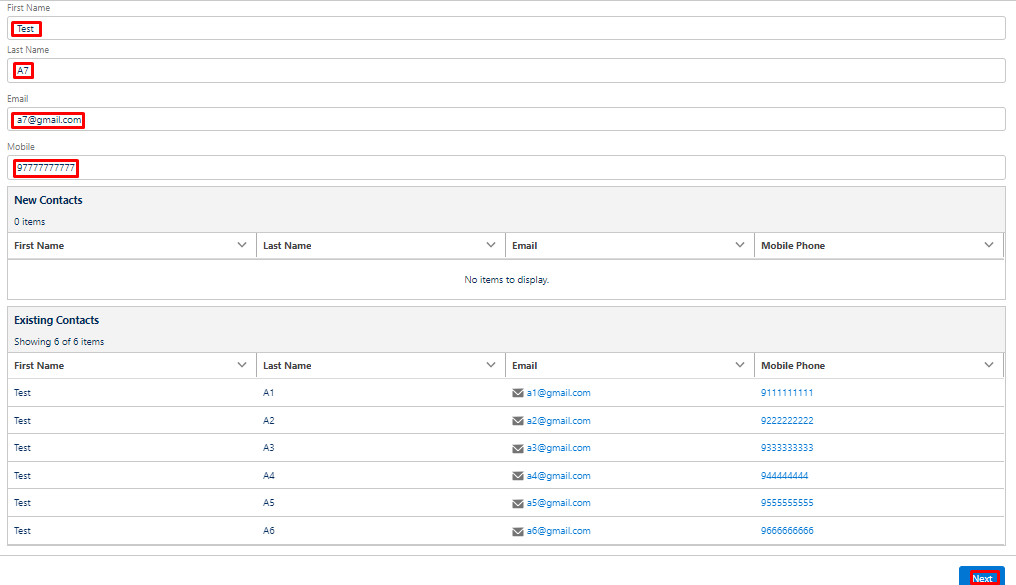
5.8. After clicking Next option the newly created contact is added in the data table.
5.9. Similarly we can add multiple contacts, and by clicking next the contacts will be added in the data table.
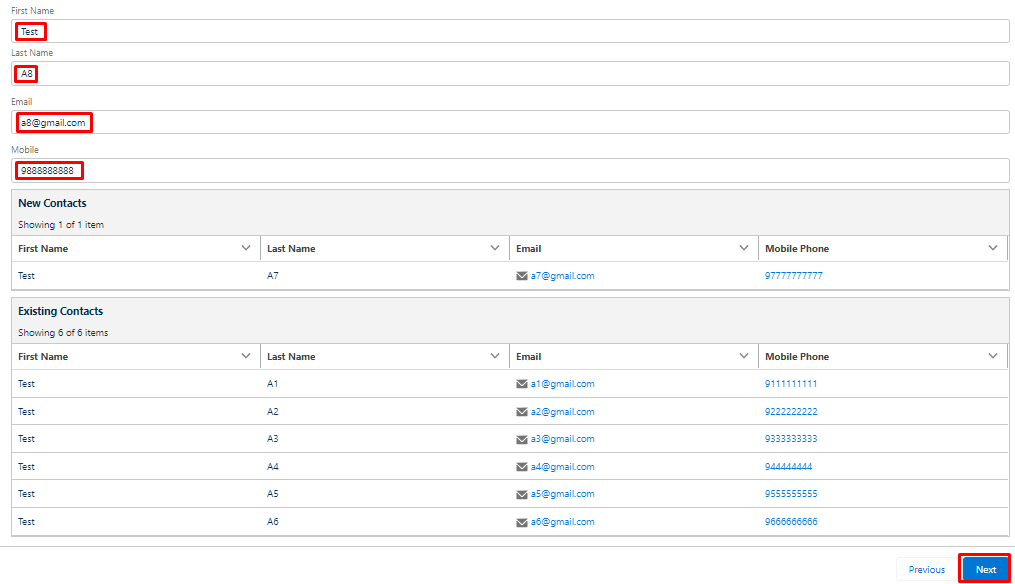
5.10. When all the contacts are added again click Next.
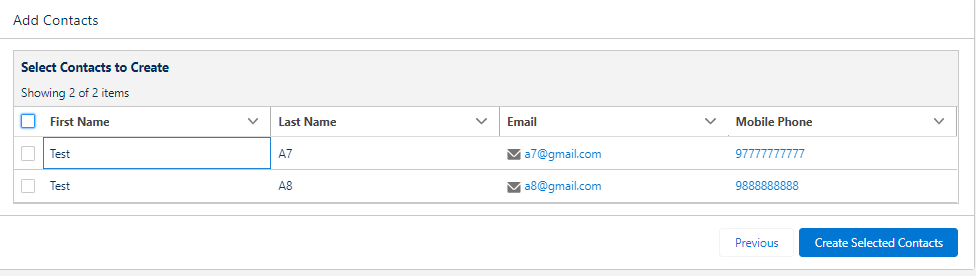
5.11. Now a data table appears displaying the newly added contact with a Header Select Contacts to Create.
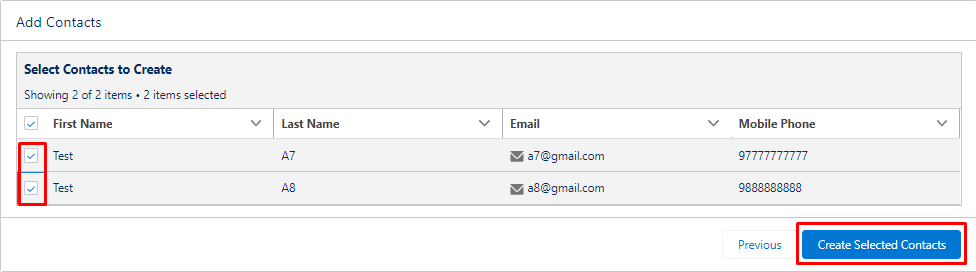
5.12. Now click on the contact checkbox which needs to be added on the account page and then click Create Selected Contacts Footer.
5.13. The flow is tested successfully with no error.
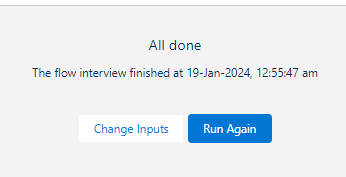
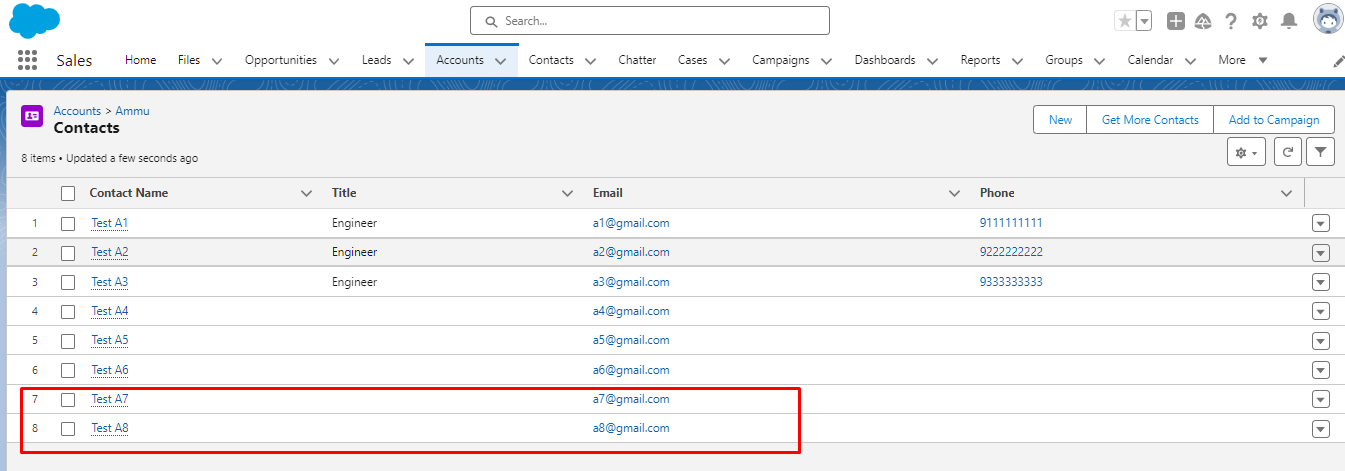
5.14. Now both the two newly created contacts are added in the particular account page.
Features
- Using the Data Table in a screen flow, it is possible to display multiple records. Users can select one or multiple records and perform actions according to your business requirements.
- You can display a list of records without offering any selection options by setting it up as View Only.
- You can set columns to Wrap the overflowing Text or Clip it.
- You can search the record by enabling the show search bar option

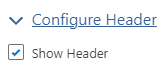
- You can configure header and footer with different custom labels.
Leave a Comment