BUSINESS CHALLENGE
There can be multiple Approval Processes for Opportunities and plenty of steps for each of those Approval Processes. How do you know which step of an Approval Process is Pending and who is the Approver for that Step?
Salesforce has Approval history for each Opportunity which shows the pending steps in its Approval Processes. But what if you wanted to see all the Pending Approval Steps for all of the Opportunities of your Org?
Though we can create a custom Process Instance Report, we cannot pull in fields from Opportunity into it. This is where we can use a Lightning Aura Component to display a table that will display the fields from Opportunity we require.
STEPS TO ACHIEVE THIS USING VS CODE
- Create a Project
- Create an Apex class with Instance variables
- Create an Apex controller
- Create a Lightning Aura Component
- Connect to the Org and Deploy the Apex Class, Controller and the Component
- Add the Component to the page
1. CREATE A PROJECT
-
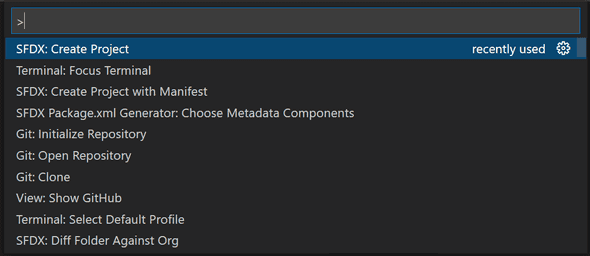
Open VS Code and Press ctrl + shift + p in Windows and Cmd + shift + p in Mac to open the Command Palette.
-
Search for SFDX: Create a Project and Select it.
-
Select Standard project template, enter the project name, hit enter and choose the folder in your system to save the project.
2. CREATE AN APEX CLASS WITH INSTANCE VARIABLES
-
Open Command Palette and Search for SFDX: Create an Apex class and Select it.
-
Enter Name of Apex Class as ProcessInstanceItems and hit enter button.
-
The following code is for the Apex class.
public class ProcessInstanceItems { private String approverName; private String approvalProcessName; private String stepName; private String opportunityName; private String opportunityStage; private String opportunityId; @AuraEnabled public String getApproverName(){ return approverName; } public void setApproverName(String newApproverName){ this.approverName = newApproverName; } @AuraEnabled public String getApprovalProcessName(){ return approvalProcessName; } public void setApprovalProcessName(String newApprovalProcessName){ this.approvalProcessName = newApprovalProcessName; } @AuraEnabled public String getStepName(){ return stepName; } public void setStepName(String newStepName){ this.stepName = newStepName; } @AuraEnabled public String getOpportunityName(){ return opportunityName; } public void setOpportunityName(String newOpportunityName){ this.opportunityName = newOpportunityName; } @AuraEnabled public String getOpportunityStage(){ return opportunityStage; } public void setOpportunityStage(String newOpportunityStage){ this.opportunityStage = newOpportunityStage; } @AuraEnabled public String getOpportunityId(){ return opportunityId; } public void setOpportunityId(String newOpportunityId){ this.opportunityId = newOpportunityId; } } -
Although you can use Instance variables with public access, private access is recommended for Encapsulation. In Encapsulation, the variables of a class will be hidden from other classes, and can be accessed only through the setter and getter methods .
-
The @AuraEnabled annotation enables client server-side access to an Apex Controller method. Providing this annotation makes your methods/Instance variables available to your Lightning Components (both Lightning Web Components and Aura Components).
3. CREATE AN APEX CONTROLLER
-
Open Command Palette and Search for SFDX: Create an Apex class and Select it.
-
Enter name of Apex class as ProcessInstanceController and hit enter button.
-
The following code is for the Apex controller.
public class ProcessInstanceController {

    @AuraEnabled
    public static List<ProcessInstanceItems> fetchProcessInstanceItems() {
        List<ProcessInstanceItems> piItemsList =new List<ProcessInstanceItems>();

        List<ProcessInstanceWorkitem> piWiList = [Select Id, ProcessInstanceId from ProcessInstanceWorkitem ];

        if (piWiList == null || piWiList.isEmpty()){
            return piItemsList;
        }
        Set<Id> piIds = new Set<Id>();
        for (ProcessInstanceWorkitem piWi : piWiList){
            piIds.add(piwi.ProcessInstanceId);
        }

        Map<Id,ProcessInstance> piMap = new Map<Id, ProcessInstance>([SELECT Id, ProcessDefinitionId, (SELECT ID, CreatedDate, StepStatus, CreatedById, ActorId, ProcessNodeId, ProcessInstanceId, TargetObjectId FROM StepsAndWorkitems where StepStatus = 'Pending' ORDER BY createdDate DESC, Id DESC) FROM ProcessInstance WHERE Id IN : piIds]);
        List<ProcessInstanceHistory> pihList = new List<ProcessInstanceHistory>();
        Set<Id> pdIds = new Set<Id>();
        for (ProcessInstance pi : piMap.values()){
            pihList.addAll(pi.StepsAndWorkitems);
            pdIds.add(pi.ProcessDefinitionId);
        }

        Set<Id> processInstanceIds = new Set<Id>();
        Set<Id> processNodeIds = new Set<Id>();
        Set<Id> targetObjectIds = new Set<Id>();
        Set<Id> userIds = new Set<Id>();
        for (ProcessInstanceHistory pih :pihList){
            targetObjectIds.add(pih.TargetObjectId);
            userIds.add(pih.ActorId);
        	processNodeIds.add(pih.ProcessNodeId);
            processInstanceIds.add(pih.ProcessInstanceId);
        }

        Map<Id, Opportunity> oppMap = new Map<Id, Opportunity>([Select Id, Name, StageName from Opportunity where Id IN : targetObjectIds]);
        Map<Id, User> userMap = new Map<Id, User>([Select Id, Name from User where Id IN : userIds]);
        Map<Id, ProcessNode> pnMap = new Map<Id, ProcessNode>([Select Id, Name from ProcessNode where Id IN : processNodeIds]);
        Map<Id, ProcessDefinition> pdMap = new Map<Id, ProcessDefinition>([Select Id, DeveloperName from ProcessDefinition where Id IN : pdIds]);

        ProcessInstanceItems piItems;
        String oppName;
        for (ProcessInstanceHistory pih : pihList){
            piItems = new ProcessInstanceItems();
            if (oppMap.get(pih.TargetObjectId).Name != oppName){
                piItems.setOpportunityName(oppMap.get(pih.TargetObjectId).Name);
            }
            piItems.setOpportunityStage(oppMap.get(pih.TargetObjectId).StageName);
            String str = piMap.get(pih.ProcessInstanceId).ProcessDefinitionId;
            piItems.setApprovalProcessName(pdMap.get(str).Developername);
            piItems.setOpportunityId(oppMap.get(pih.TargetObjectId).Id);
            piItems.setStepName(pnMap.get(pih.ProcessNodeId).Name);
            piItems.setApproverName(userMap.get(pih.ActorId).Name) ;
            piItemsList.add(piItems);
            oppName = oppMap.get(pih.TargetObjectId).Name;
        }
        return piItemsList;
    }
}
4. CREATE AN AURA COMPONENT
-
In the Command Palette, Search for SFDX: Create Aura Component and Select it.
-
Enter the Aura Component name as ProcessInstance and hit the enter button.
-
When you Create the Aura Component in VSCode, an Aura bundle is created which will show up on the left pane.
-
A Component bundle consists of a Component and all its related resources. Here we will use the Component, JavaScript Controller and Style(CSS).
-
Use the following code for the Component of the bundle(file ending with .cmp)
<aura:component implements="force:appHostable,flexipage:availableForAllPageTypes,flexipage:availableForRecordHome,force:hasRecordId" controller="ProcessInstanceController" access="global"> <aura:attribute name="cbaseURL" type="String"/> <aura:handler name="init" value="{!this}" action="{!c.doInit}"/> <aura:attribute name="opportunityReport" type="ProcessInstanceItems[]"/> <div class = "tableDiv slds-card slds-scrollable"> <table class="slds-table slds-table_cell-buffer slds-table_bordered slds-table_col-bordered" aria-label="Example table of Opportunities with vertical borders"> <thead> <tr class="slds-line-height_reset"> <th class="" scope="col"> <div class="slds-truncate" title="Opportunity Name">Opportunity Name</div> </th> <th class="" scope="col"> <div class="slds-truncate" title="Stage">Stage</div> </th> <th class="" scope="col"> <div class="slds-truncate" title="Approval Process Name">Approval Process : Name</div> </th> <th class="" scope="col"> <div class="slds-truncate" title="Step Name">Step : Name</div> </th> <th class="" scope="col"> <div class="slds-truncate" title="Approver Name">Approver Name</div> </th> </tr> </thead> <tbody> <aura:iteration var="item" items="{!v.opportunityReport}" indexVar="indx"> <tr class="slds-hint-parent"> <th data-label="Opportunity Name" scope="row"> <div class="slds-truncate" title="{!item.opportunityName}"> <a href ="{!cbaseURL+'/lightning/r/Opportunity/'+item.opportunityId+'/view'}">{!item.opportunityName}</a> </div> </th> <td data-label="Stage"> <div class="slds-truncate" title="{!item.opportunityStage}">{!item.opportunityStage}</div> </td> <td data-label="Approval Process Name"> <div class="slds-truncate" title="{!item.approvalProcessName}">{!item.approvalProcessName}</div> </td> <td data-label="Step Name"> <div class="slds-truncate" title="{!item.stepName}">{!item.stepName}</div> </td> <td data-label="Approver Name"> <div class="slds-truncate" title="{!item.approverName}">{!item.approverName}</div> </td> </tr> </aura:iteration> </tbody> </table> </div> </aura:component> -
Use the following code for the JavaScript Controller of the Bundle(file ending with .js).
({ doInit : function(component, event, helper) { var urlString = window.location.href; var baseURL = urlString.substring(0, urlString.indexOf(".com")+4); component.set("v.cbaseURL", baseURL); var action = component.get("c.fetchProcessInstanceItems"); action.setCallback( this, function(response) { var state = response.getState(); if (state === "SUCCESS") { component.set("v.opportunityReport", response.getReturnValue()); console.log(response.getReturnValue()); } }); $A.enqueueAction(action); } }) -
The window.location.href returns the href(URL) of the Current Page which can be used to retrieve the base url which is different in various environments.
-
Use the following code for Styling the table(file ending with .css).
.THIS.tableDiv {
    height:100vh;
}
5. CONNECT TO THE ORG AND DEPLOY THE APEX CLASS, CONTROLLER AND THE COMPONENT
-
Open Command Palette and Search for SFDX: Authorize an Org and Select it.
-
Choose your Org type and if it is Custom, Paste your Orgs login URL in the next step.
-
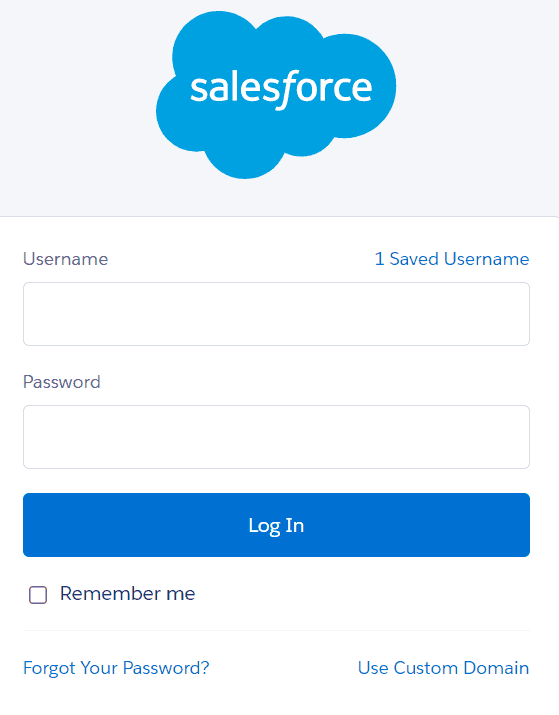
On hitting enter you will be taken to the Salesforce Login Page in a browser.
-
Enter the Credentials and Login.
-
Head back to VSCode and you will see the notification SFDX: Authorize an Org successfully ran.
-
On the left pane, right click on the Apex class file ProcessInstanceItems and Select SFDX: Deploy Source to Org.
-
You should see the notification SFDX: Deploy source to Org successfully ran shortly.
-
Once the Apex class is deployed, Deploy the Controller ProcessInstanceController followed by the Aura Component folder ProcessInstance respectively.
-
You should see a Success Notification for each deployment.
NOTE:
Access for the Apex class and the Apex Controller should be given to the respective profiles who has to view the data displayed with the help of this Lightning Aura component.
6. ADD THE COMPONENT TO THE PAGE
The Custom Report we created using the Lightning Aura Component can either be placed on the Home page or can be added to a New Tab of an App using the Lightning App Builder.
-
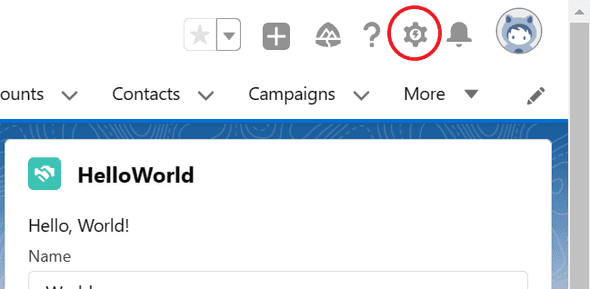
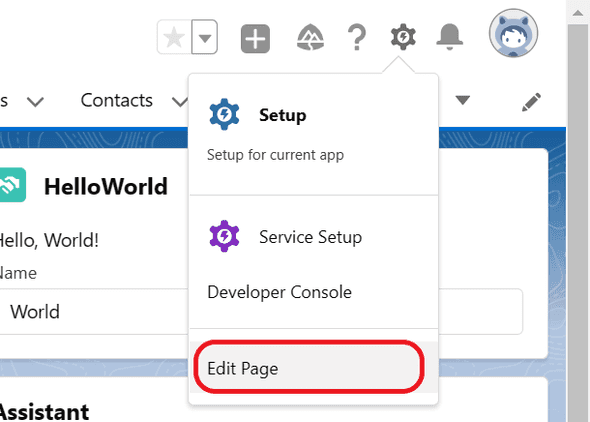
To add the Component to the Home Page, Select Home Page → Click on the gear icon on the top right corner.
-
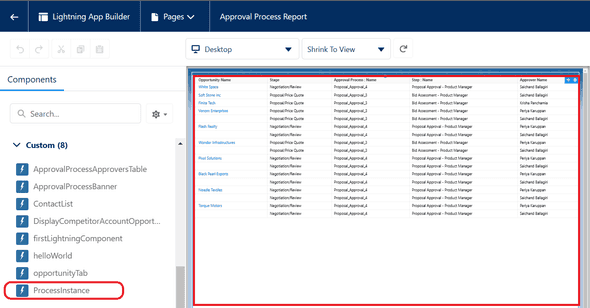
Select Edit Page, Drag the Custom Component ProcessInstance to the required position on the page.
-
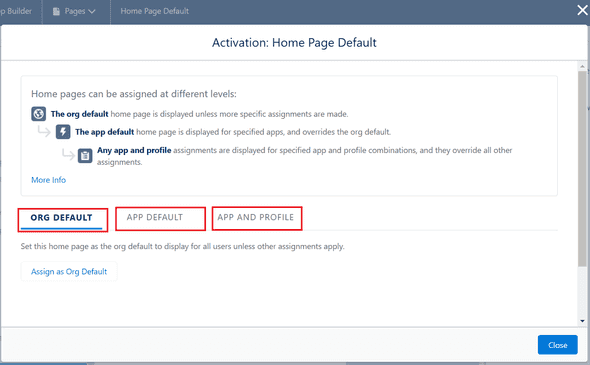
Save and then Activate the page.
-
Assign as Org Default, App Default or App and Profile as per the requirement and save it.
-
To add the Component on a New Tab of an app, check the step by step explanation in this blog Embed Lightning Component in the Navigation Bar of an App
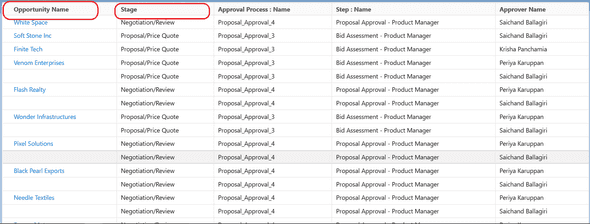
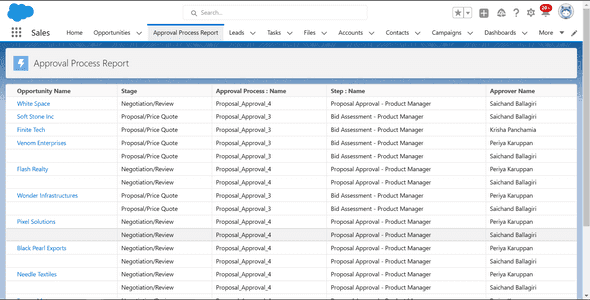
THIS IS HOW THE COMPONENT LOOKS IN A NEW TAB OF AN APP
WRAPPING IT UP
In this blog, we have covered how to Display Opportunity Information with Pending Approval Steps using a Lightning Aura Component.

Leave a Comment