BUSINESS CHALLENGE
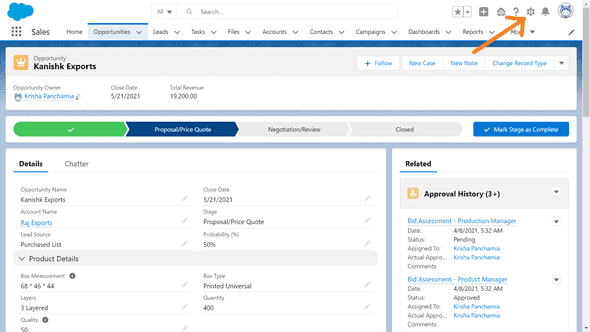
How do you know who the Approvers are in an Approval process for an Opportunity and the status of the Approval ?
Salesforce doesn’t display the Approval history and the step status on the Approval page. However, there is a Related Section with this information.
We can overcome this challenge by using a Lightning Aura Component and display the Approval History on the Approval page.
STEPS TO CREATE APPROVAL HISTORY LAYOUT
- Create an Apex Controller
- Create a lightning Aura component Bundle
- Place the component on the page
1. CREATE AN APEX CONTROLLER
-
Create an Apex class ApprovalProcessApproversController.
-
Create a public method getOpportunityApprovalHistory that will return a list of Process Instance History which contains all the approvers.
-
Retrieve the required information like Approver Name, Created date, Step status and Original Approver Name.
The code for the apex class is here
ApprovalProcessApproversController.apxc
public class ApprovalProcessApproversController {
	@AuraEnabled
	public static List<ProcessInstanceHistory> getOpportunityApprovalHistory(String recordId){
         List<ProcessInstanceWorkitem> piwiList = [Select Id, ProcessInstanceId from ProcessInstanceWorkitem where Id = :recordId];
         if(piwiList != null && !piwiList.isEmpty()) {
               ProcessInstance pi = [SELECT Id, (SELECT ID, CreatedDate, TargetObjectId, ProcessNodeId, StepStatus, Comments,Actor.Name,OriginalActor.Name FROM StepsAndWorkitems ORDER BY createdDate DESC, Id DESC) FROM ProcessInstance WHERE Id = :piwiList.get(0).ProcessInstanceId];
               return pi.StepsAndWorkitems;
         }
         return null;
    }
}
2. CREATE A LIGHTNING AURA COMPONENT BUNDLE
-
Create a lightning Aura component
-
Create controller resource
-
Use styling for the component
2.1 CREATE A LIGHTNING AURA COMPONENT
-
Create a lightning component with the name ApprovalProcessApproversTable.
-
Use the Apex class created in the step1 i.e ApprovalProcessApproversController as the Controller for the Aura component.
-
Create two attributes. recordID (for input) of String data type and opportunityApproversHistory (for output) which is an array of Process Instance History.
-
Use HTML table.
The code for this aura component can be like this
ApprovalProcessApproversTable.cmp
<aura:component implements="force:appHostable,flexipage:availableForAllPageTypes,flexipage:availableForRecordHome,force:hasRecordId"
   controller="ApprovalProcessApproversController" access="global">
    <aura:handler name="init" value="{!this}" action="{!c.doInit}"/>
    <aura:attribute name="recordId" type="String" />
    <aura:attribute name="opportunityApproversHistory" type="ProcessInstanceHistory[]"/>

    <div class="banner">
        <table class="slds-table slds-table--bordered slds-table--cell-buffer">
            <thead>
                <tr class="slds-text-title">
                    <th scope="col">
                        <div class="slds-truncate" title="Approver">Approver</div>
                    </th>
                    <th scope="col">
                        <div class="slds-truncate" title="Created Date">Date</div>
                    </th>
                    <th scope="col">
                        <div class="slds-truncate" title="Status">Status</div>
                    </th>
                    <th scope="col">
                        <div class="slds-truncate" title="Original Approver">Original Approver</div>
                    </th>
                </tr>
            </thead>
        	<tbody>
                <aura:iteration var="history" items="{!v.opportunityApproversHistory}" indexVar="idx">
                    <tr>
                        <td data-label="Approver">
                        	<span>{!history.Approver.Name}</span>
                        </td>
                        <td data-label="Created Date">
                            <ui:outputDateTime value="{!history.CreatedDate}"/>
                        </td>
                        <td data-label="Status">
                        	<span>{!history.StepStatus}</span>
                        </td>
                        <td data-label="Original Approver">
                        	<span>{!history.OriginalApprover.Name}</span>
                        </td>
                    </tr>
                </aura:iteration>
            </tbody>
        </table>
	</div>
</aura:component>
NOTE
- A component bundle contains a component or an app and all its related resources. Here we use component, controller and style resources.
- The handler in the Aura component is performed each time the component runs.
- There are two Controllers mentioned here. One is the Apex class we used inside the component and the other is the Java script controller which is a resource of the component bundle.
2.2 CREATE CONTROLLER RESOURCE
-
Define the handler mentioned in the Aura component in the controller resource.
The code for the components controller resource is here
ApprovalProcessApproversTable.js
({
	doInit : function(component, event, helper) {
		var action = component.get("c.getOpportunityApprovalHistory");
     	action.setParams({
            "recordId": component.get("v.recordId")
     	});
     	action.setCallback( this, function(response) {
            var state = response.getState();
            if (state === "SUCCESS") {
                component.set("v.opportunityApproversHistory", response.getReturnValue());
                console.log(response.getReturnValue());
            }
        });
        $A.enqueueAction(action);
	}
})
2.3 USE STYLING FOR THE COMPONENT
-
Use the font size, color, text alignment, and background color as per the requirement.
The styling for the component can be like this.
ApprovalProcessApproversTable.css
.THIS.banner {
  font-size: 12px;
  color: black;
  text-align: center;
  background-color: white;
}
-
3. PLACE THE COMPONENT ON THE PAGE
-
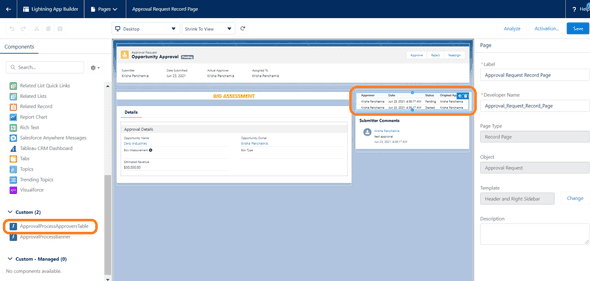
Go to the Opportunity Approval page and click on the gear icon → edit page and drag and drop the Aura component from the components on the left and place it at the required position on the page.
-
Next click save → activation which applies the changes made and select the default Org type required and click close.
THIS IS HOW IT APPEARS ON THE PAGE
The table can be seen in the page which is marked in the image below.
WRAPPING IT UP
In this blog post we have covered how to create an Approval History Layout to show the Approver and step status in an Approval page.


Leave a Comment